Loyalty Workflow Builder
A workflow is a rule that rewards customers automatically. Each workflow starts with a trigger ("when this happens"), can branch on conditions ("only if…"), and runs one or more actions ("do this"). You build it visually on a canvas.
Open the builder from the Loyalty Dashboard: click Manage Workflows, then Create Workflow and pick a ready-made recipe or Start from scratch. To edit an existing workflow, click its name in the list.
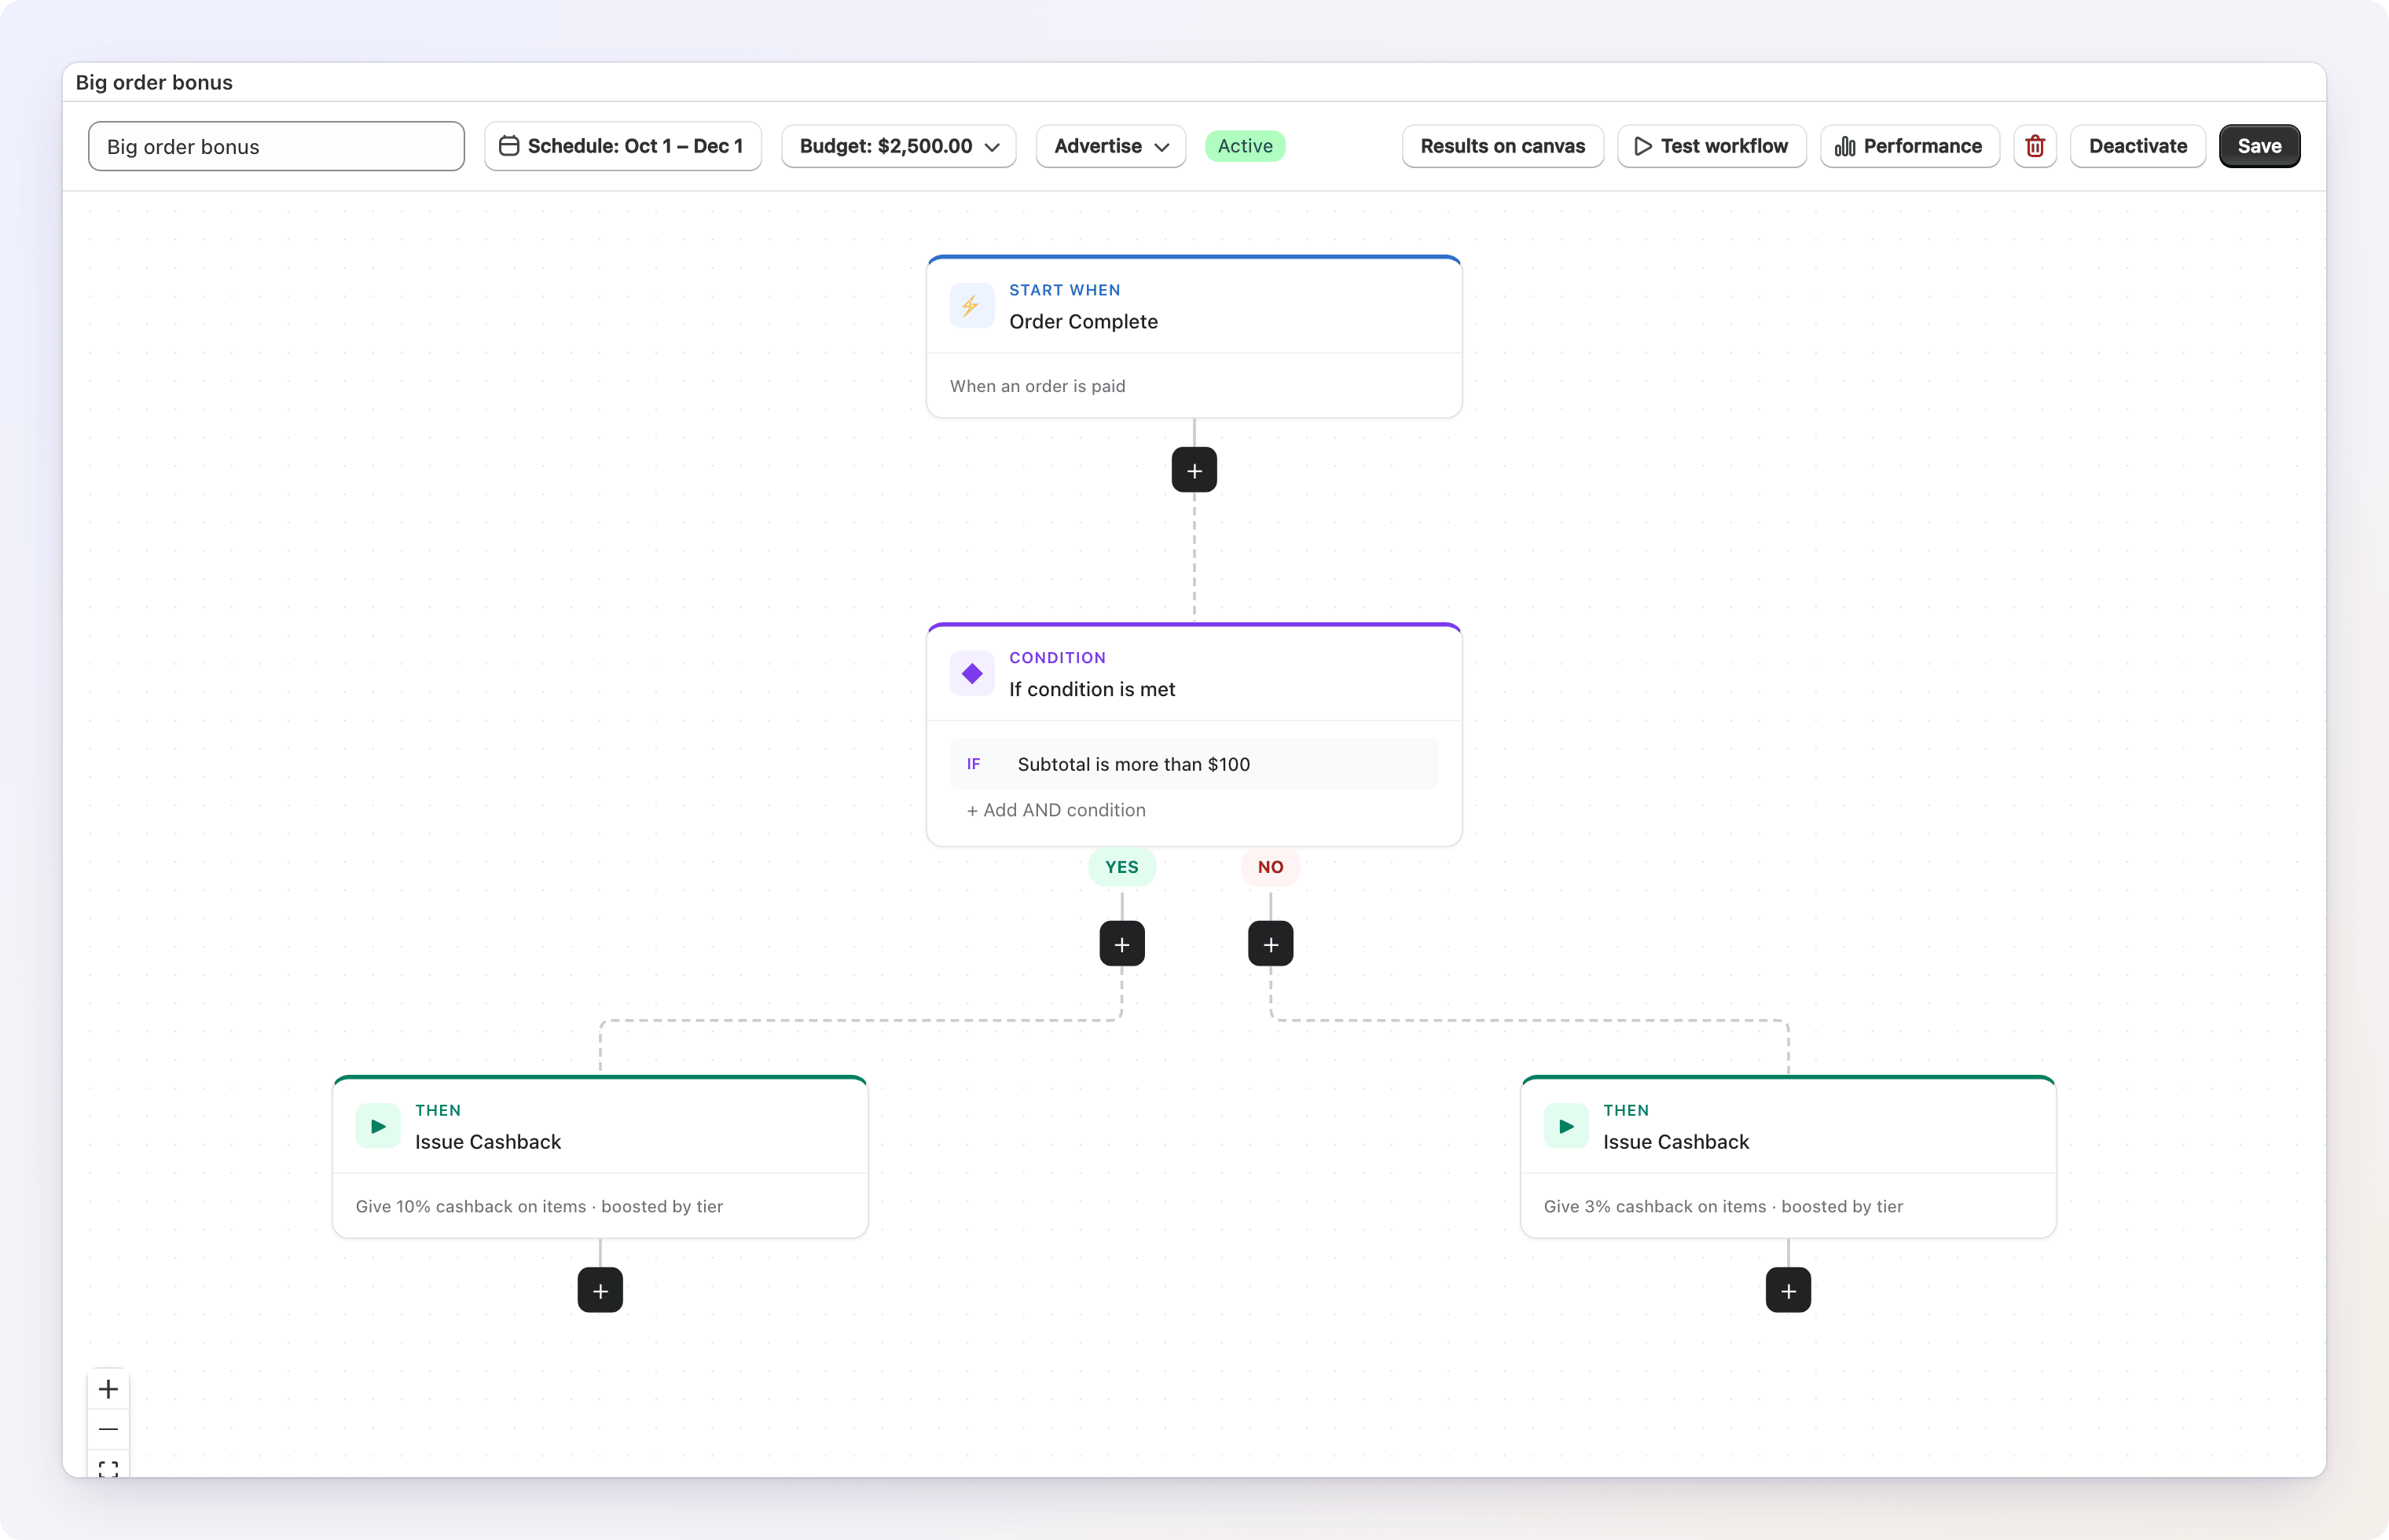
The builder has three areas:
- Toolbar (top) — the workflow name, its schedule and budget, its status, and the action buttons. See The toolbar.
- Canvas (center) — the visual flow of your trigger and steps.
- Config panel (right) — settings for whatever step you've selected. Click Performance and this panel shows the workflow's results instead.
Orders without a customer account
Workflows reward a customer, so an order placed at guest checkout — with no customer attached — doesn't run any workflow.
Step 1 — Choose a trigger
Every workflow needs exactly one trigger. Click the Start when... card on the canvas and pick a trigger from the menu. To change it later, select the trigger and click Change in the config panel — switching clears the trigger's settings, and asks you first if you had changed any.
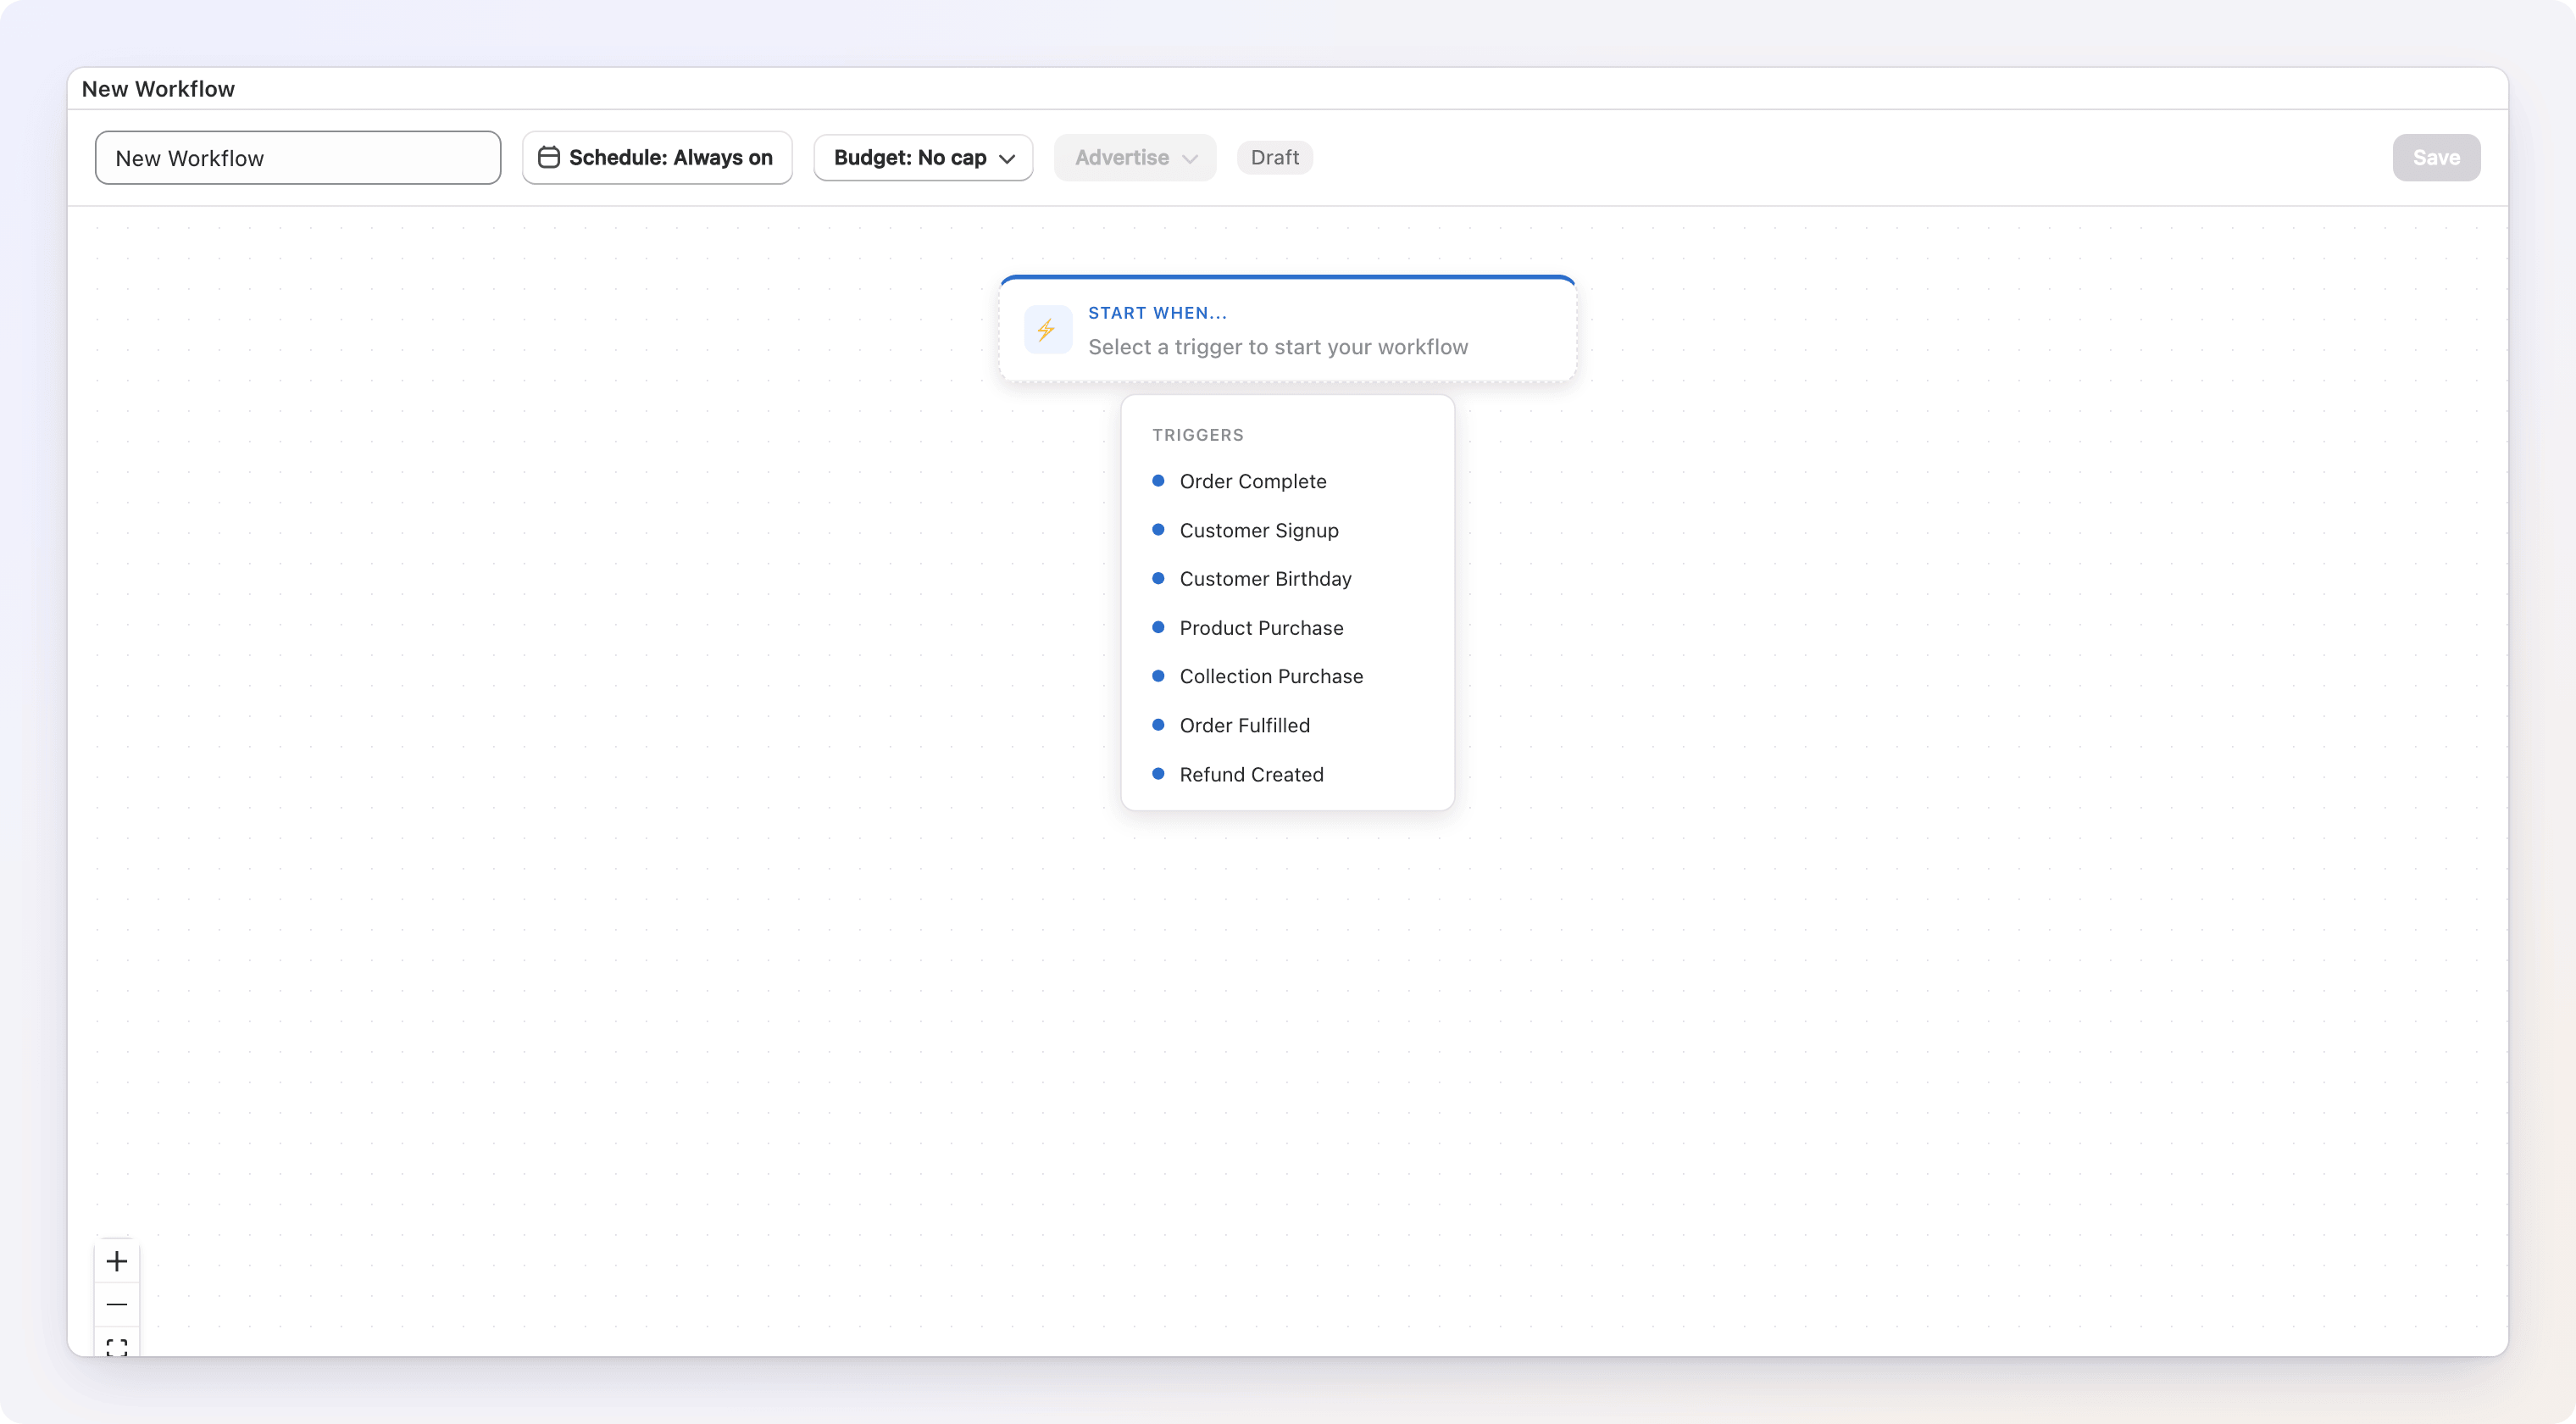
| Trigger | Fires when… |
|---|---|
| Order Complete | An order is paid. Optionally set Only orders with a subtotal of at least an amount (items after discounts, before shipping and tax), or tick Skip orders paid entirely with discounts. |
| Customer Signup | A new customer account is created. Optionally tick Only if the email is verified at sign-up — a customer who verifies later isn't picked up, because Shopify sends no second event. |
| Customer Birthday | It's the customer's birthday, checked once a day at 09:00 UTC. Choose On the day or Days before (up to 30). The birthday comes from a customer metafield (custom.birthday by default — open More options to use another namespace.key) or from a customer tag in the form bday:MM-DD. |
| Product Purchase | A specific product is purchased. Choose the products, a minimum total quantity (1 by default), and an optional amount range those products must add up to. |
| Collection Purchase | A product from a chosen collection is purchased. Optionally set an amount range the collection's items must add up to. |
| Order Fulfilled | An order is fully shipped (the default) — or choose Any shipment. |
| Refund Created | A refund is issued. Choose Any refund, Full refund only, or Partial refund only, and an optional minimum refund amount. |
Selecting a trigger opens its settings in the config panel.
Picking single variants
The product picker opens with variants shown. Tick every variant and the whole product is chosen, so variants you add later count too. Tick only some and the workflow is limited to exactly those variants — useful when one product mixes gift card values with other items. The panel counts them separately, for example "1 product, 9 variants".
Reward tiers by amount
Product Purchase and Collection Purchase can fire only when the chosen products (or the collection's items) add up to an amount From one value Under another — for example from $150 under $200. Only the matching lines count, at their price after discounts; the rest of the cart doesn't. The lower amount is included and the upper one is not, so you can build one workflow per tier ($150–$200, $200–$250, … and a last one from $1,000 with no upper amount) and exactly one of them fires for any order. The panel reads your range back ("Matches from $150 to under $200"), and a range no order could match is flagged. Use {{ trigger.matched_amount }} in a message to show the amount that counted. To reward a whole ladder in one workflow — and count a customer's purchases over a time window as one — use Reward Tiers instead.
Full or partial refund
A refund counts as full when, together with the order's earlier refunds, it pays back the whole order total — so if you refund part of an order first and the rest later, the first refund is partial and the second is full. Every refund before that point is partial. Under Refund Created, conditions such as Order contains product check the order that was refunded — for example, run a workflow only for refunds of orders that contained your gift card product. The workflow runs on every refund of an order.
Triggers decide which conditions and actions are available
Conditions that read order details (like Order Amount) and the Add Order Tag / Note and Reward Tiers actions only appear when your trigger provides order data. Under Customer Signup or Customer Birthday, for example, they're hidden because there's no order. If you switch a workflow's trigger after adding one of them, the step is flagged and the workflow can't be activated until you change the trigger back or remove the step.
Step 2 — Add steps
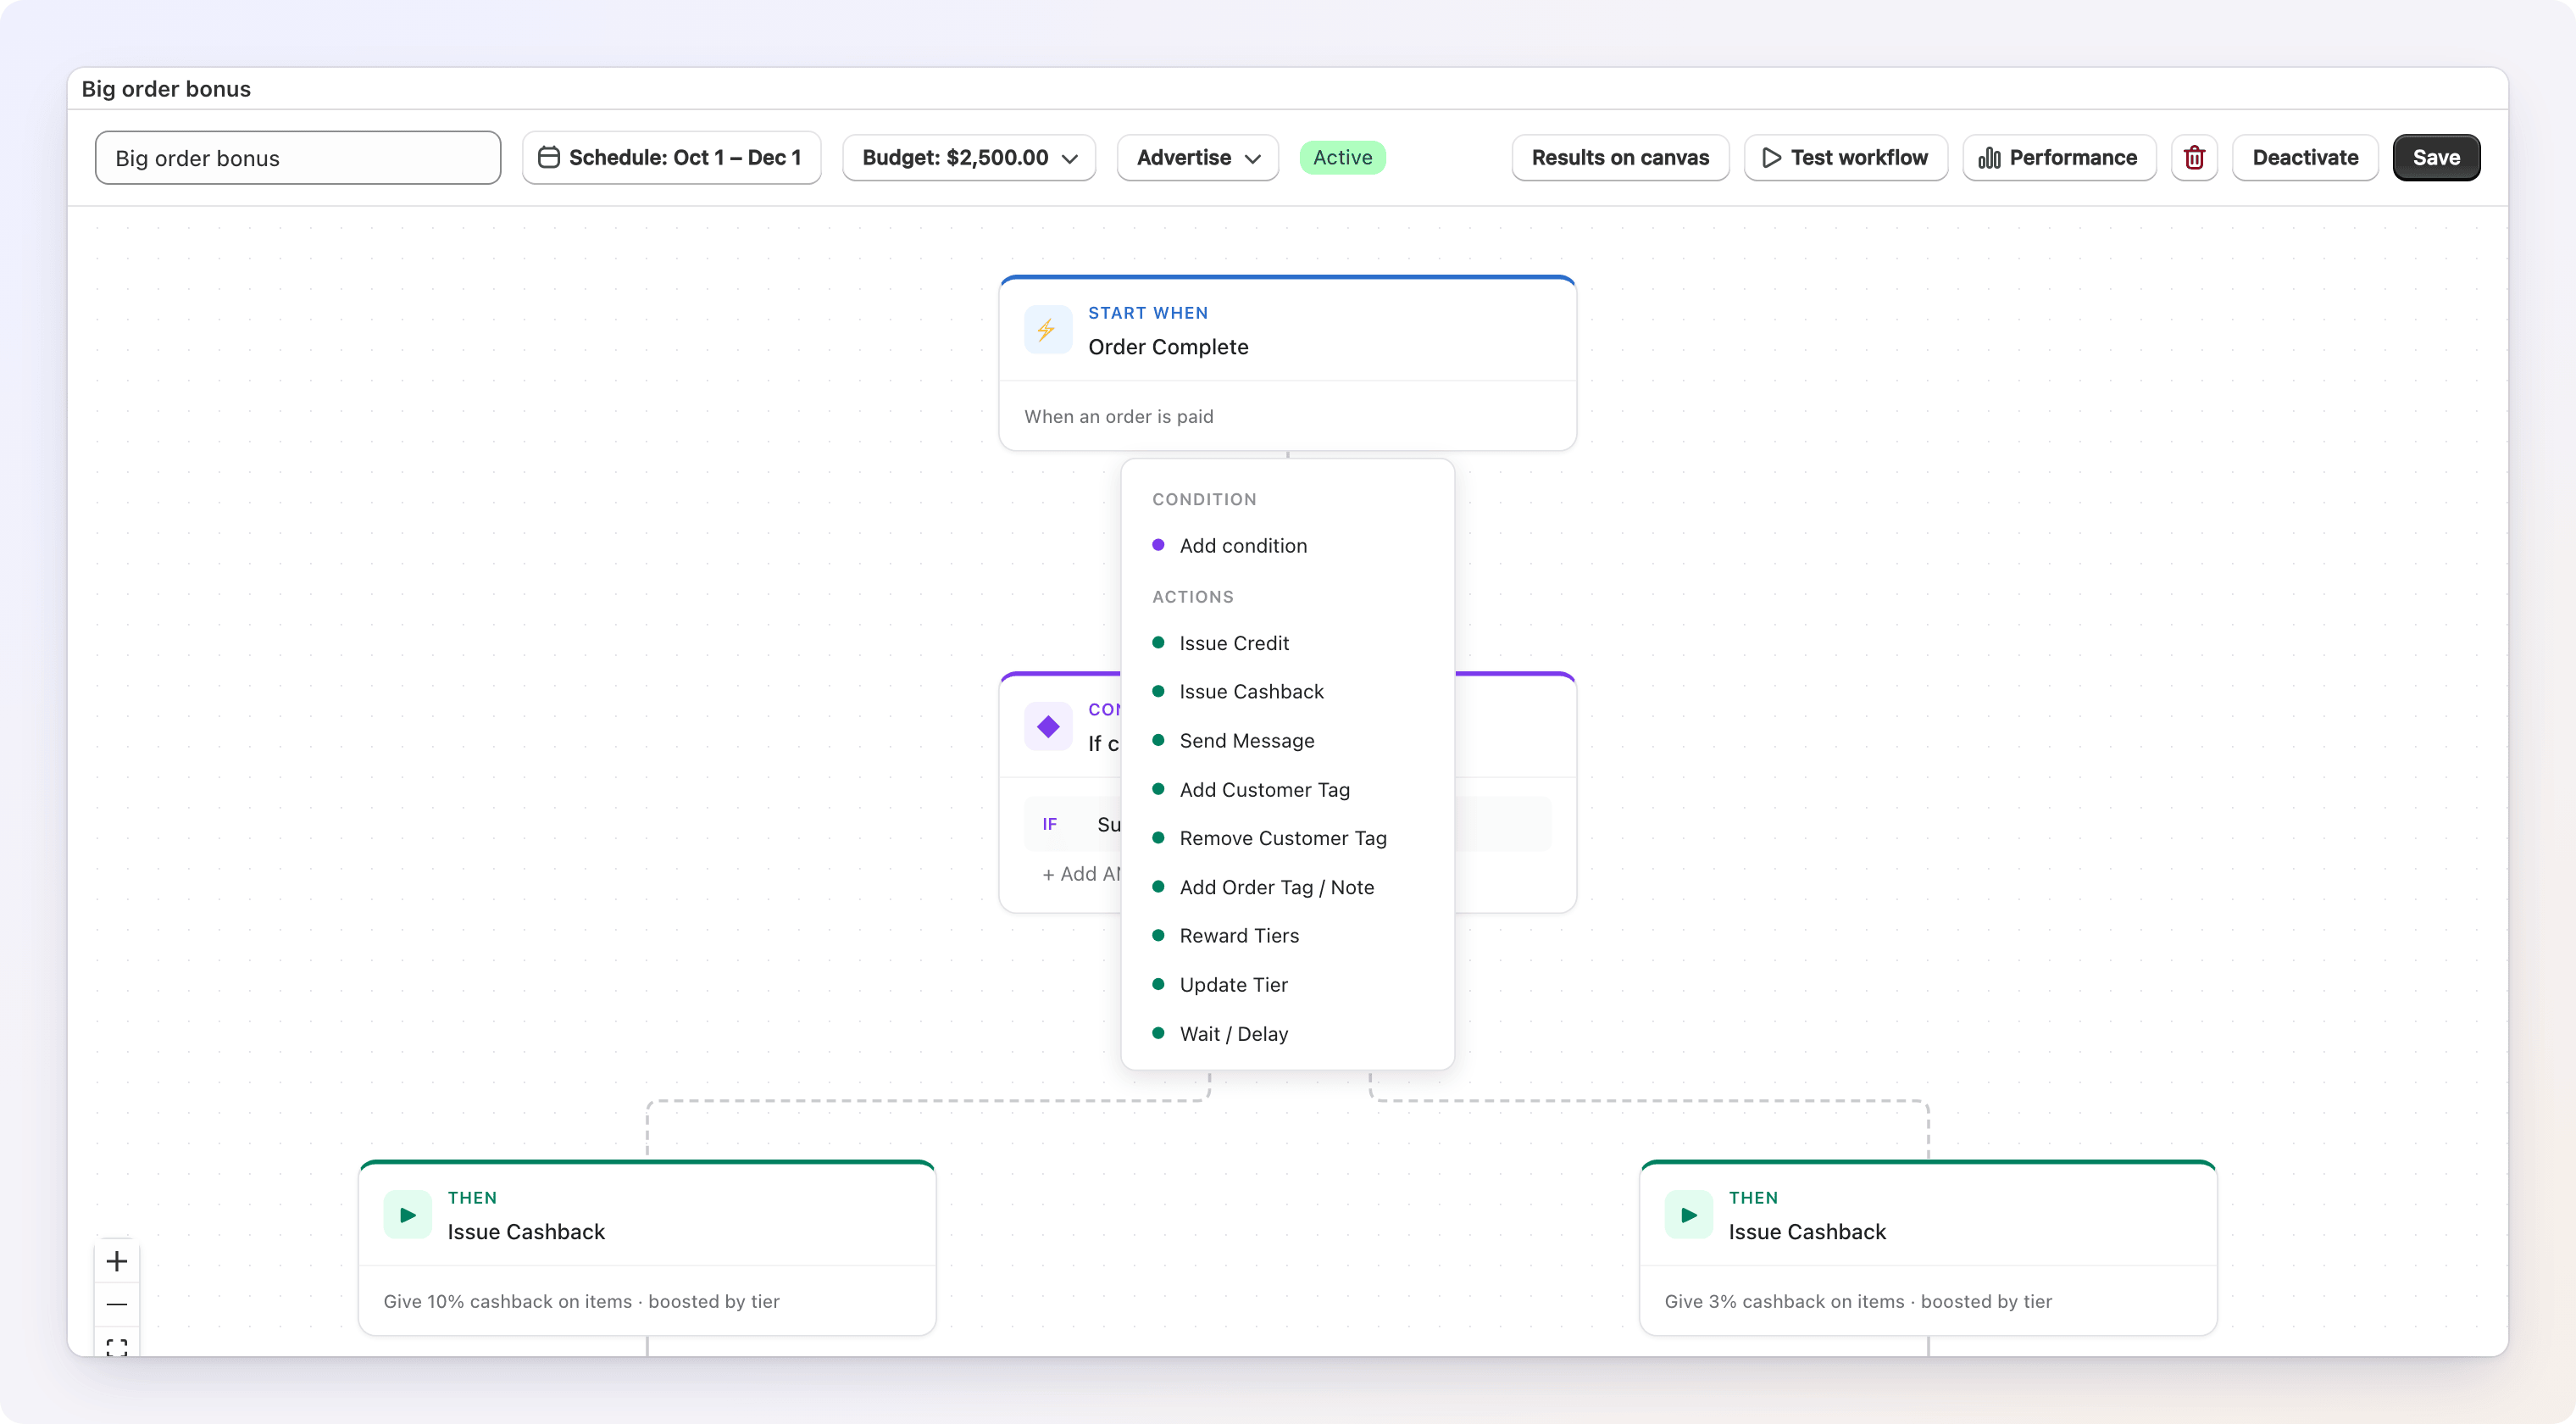
Click the + button below any card to add the next step. You can add a condition or an action. To remove a step, click the ✕ on its card.
Conditions
A condition is a gate. Steps placed on its YES branch run only when the check passes; steps on the NO branch run when it fails.
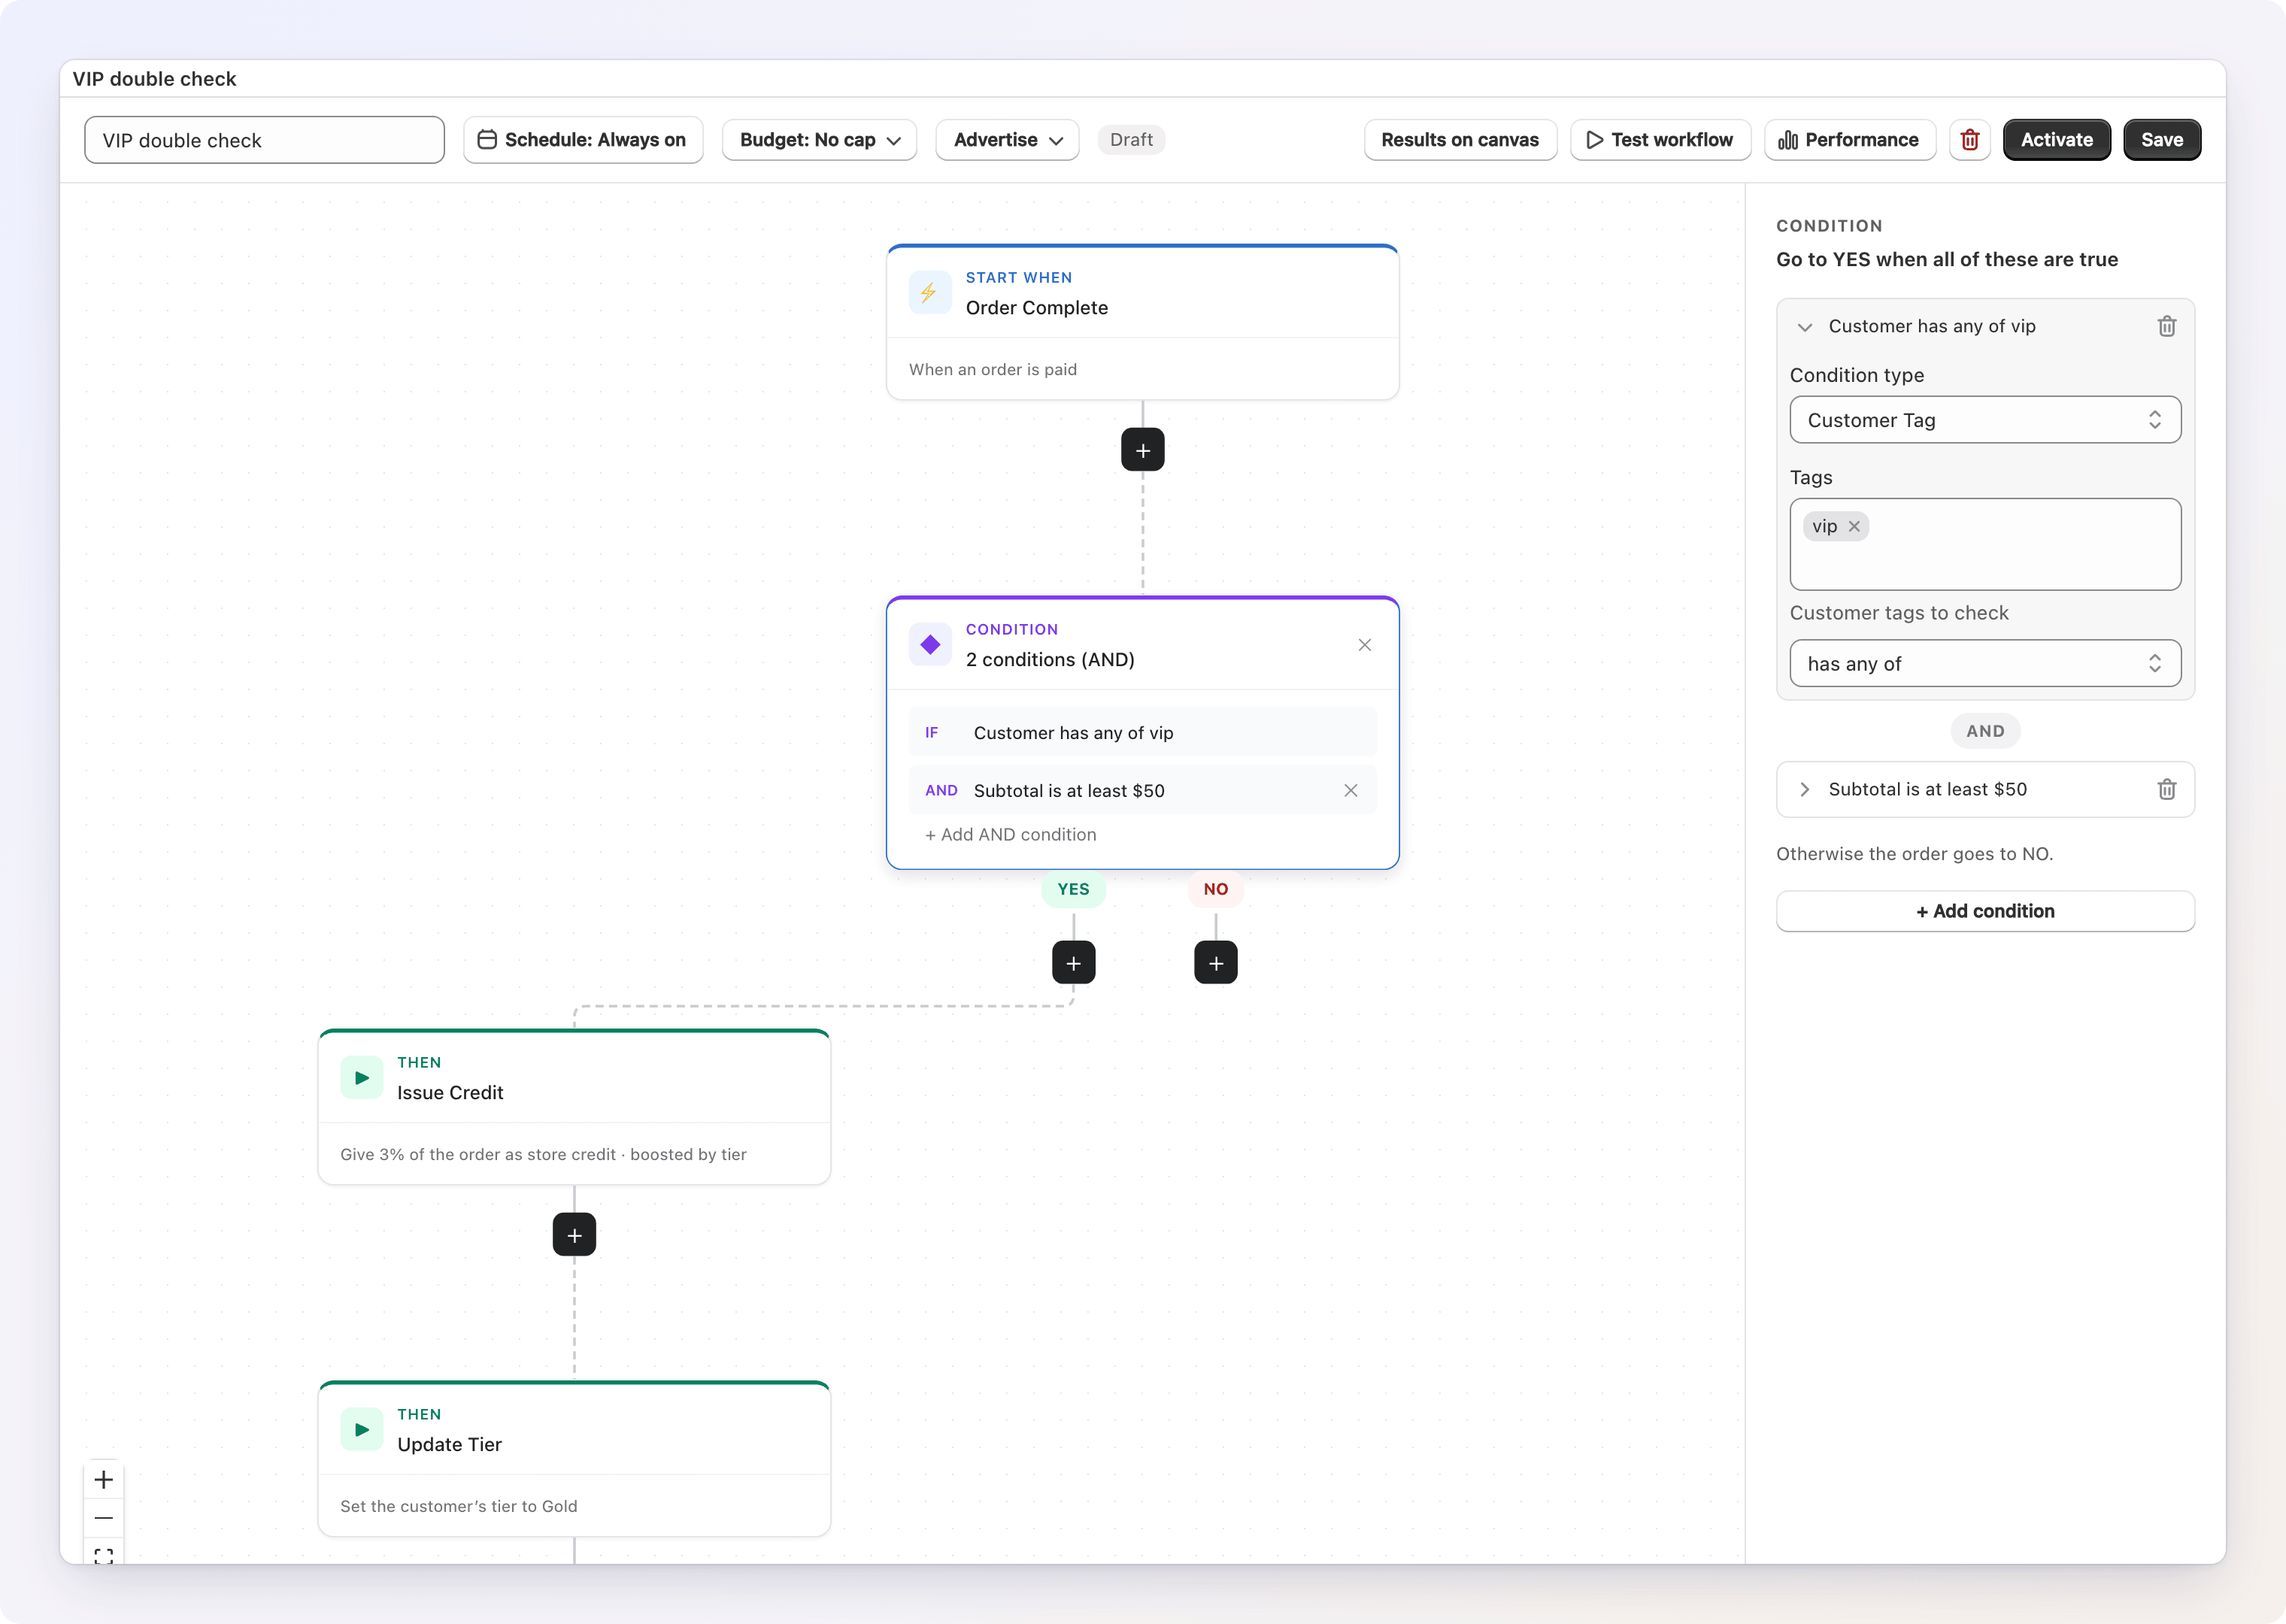
Choose Add condition in the menu, then pick what to check in the config panel's Condition type select. The panel reads as a sentence — "Go to YES when all of these are true" — and each check offers plain-language comparisons:
| Condition | Checks | Choices |
|---|---|---|
| Order Amount | The order's Subtotal (before tax/shipping), Total (after tax/shipping), or Discount amount | is at least, is more than, is at most, is less than, is exactly |
| Customer Tag | The customer's tags in Shopify | has any of, has all of, has none of |
| First Order | Whether this is the customer's first order | is the first order, is a repeat order |
| Tier Level | The customer's current loyalty tier, compared by tier level | is, is not, is at least, is at most |
| Order contains product | Whether specific products (or variants) are in the order, with a minimum quantity | contains, does not contain |
| Product in Collection | Whether ordered products belong to certain collections | has a product from, has only products from, has no products from |
| Order Item Count | The number of items, as Total quantity or Unique items | the same five comparisons as Order Amount |
| Customer Total Spent | The customer's lifetime spend, before this order | the same five comparisons as Order Amount |
| Tier Reward Earned | Whether the Reward Tiers step before it gave this order a top-up. Offered once the workflow has a Reward Tiers step | earned a tier reward top-up, earned no top-up |
| Tier Reward Reduced | Whether the refund lowered the tier reward — see Refunds and Reward Tiers. Offered once the workflow has a Reward Tiers Refund step | reduced the tier reward, left the tier reward as it was |
To require several checks at once, click + Add condition in the panel — every row must pass for the YES branch; otherwise the order takes NO. Click a row to open it, and the trash icon to remove it.
How First Order, Customer Total Spent, and Tier Level see your customers
Gift Card Hero counts each customer's orders and lifetime spend itself, starting when the customer first received a reward — that's when their rewards balance is created. Orders from before that aren't counted. So First Order is true for any customer who hasn't received a reward yet, even if they've shopped with you before, and Customer Total Spent starts from zero. Both look at the customer before the current order. A customer with no tier never passes a Tier Level check — not even "is not". See Tiers for how spend is counted.
Actions
Actions are what the workflow actually does.
| Action | What it does |
|---|---|
| Issue Credit | Adds store credit to the customer's rewards balance. Choose Fixed amount or % of order, and whether to Boost by customer tier. Under More options: a maximum credit cap, when the credit expires, and a note. |
| Issue Cashback | Gives a percentage of the order back as store credit. Set the percentage and an optional maximum. The calculation starts from the items after discounts, and you can add shipping and tax to it. Under More options: a minimum order amount and a note. |
| Send Message | Sends a message to the customer by email, SMS, or as a Klaviyo event. For email, start from a template — Credit earned, Tier changed, Credit expiring, Birthday reward, one you've saved, or blank — and edit it freely. See Send a message below. |
| Add Customer Tag | Adds one or more tags to the customer in Shopify. |
| Remove Customer Tag | Removes one or more tags from the customer. |
| Add Order Tag / Note | Adds tags to the order and a line to its note in Shopify, so your staff can see what the workflow did when they look the order up. Order triggers only. See Marking the order below. |
| Reward Tiers | Adds up the customer's purchases over a time window and works out the reward of the tier they reach — one table instead of one workflow per tier. Issues no store credit. See Tier rewards below. |
| Reward Tiers Refund | Under Refund Created: works out what the refund did to the Reward Tiers reward of the refunded order — the reward before, after, and how much was taken off. See Refunds and Reward Tiers below. |
| Update Tier | Up one tier, Set to a specific tier, or Recalculate from spend. See Tiers. |
| Wait / Delay | Pauses the workflow for a number of minutes, hours, or days before the following steps run. See Delayed rewards with Wait / Delay. |
To swap a selected action for another, click Change at the top of the config panel. As with triggers, switching clears the step's settings.
One channel per action
Email, SMS, and a Klaviyo event are each their own action — to reach a customer by both email and SMS, add two Send Message actions. See Send a message for channels, variables, and testing.
How Issue Credit and Issue Cashback work out the amount
- The base. Issue Credit with Fixed amount pays that amount per order. With % of order — and for Issue Cashback — the base is the order's subtotal: items after discounts, before shipping. Issue Cashback lets you add to it: click Change next to "Based on" and tick + shipping and/or + tax. With tax-inclusive prices, leaving + tax unticked removes the tax portion from the base.
- The tier boost. With Boost by customer tier on (the default), the amount is multiplied by the customer's tier multiplier. A customer with no tier gets no boost.
- The cap. The maximum credit (or cashback) is applied after the boost, in both modes — so a 2x tier can never pay more than the cap.
- Rounding. The result is rounded to cents. An amount of zero issues nothing.
Issue Cashback's Only for orders of at least (under More options) is checked against the same base, so adding shipping or tax to the base also counts toward the minimum.
The tier used for the boost is the customer's tier before this order is counted. An order that lifts a customer into a higher tier is rewarded at the old tier; the next order gets the new one.
Credit expires (Issue Credit, under More options) offers Store default and After N days. Today Store default means the credit doesn't expire — there's no store-wide expiry setting. Choose After N days to give the credit an expiry date. Issue Cashback has no expiry option, so cashback doesn't expire. See the Money FAQ for how expiry works.
Rewards accrue to the customer's balance
Credit and cashback are added to the customer's single rewards balance, which customers spend with their rewards code. See How customers redeem rewards.
Delayed rewards with Wait / Delay
The Wait / Delay action holds the steps after it until a set time has passed. Enter a number and choose Minutes, Hours, or Days; a new step starts at one day.
It's handy for holding a reward until after your refund window. For example: Order Complete → Wait / Delay 14 days → Issue Cashback.
What happens when the wait ends:
- The steps continue as the order was when it was placed. The reward is worked out from the order as it was at the start — a partial refund during the wait does not reduce it, and credit that was never issued can't be clawed back.
- A full refund voids the reward. If the order has been fully refunded by then, the remaining steps don't run — no credit and no message.
- A deleted workflow, or pending orders you canceled, don't continue.
- Turning the workflow off doesn't stop waiting orders. A paused run finishes even if the workflow is now inactive, unless you cancel it — see Turning a workflow off with orders in progress. Spending limits still apply at the moment credit is issued.
- If Gift Card Hero can't check the order with Shopify at that moment, the steps go ahead rather than drop a reward.
Resumes run on a schedule, so steps can start a little after the time is up. The workflow counts as one run, however many waits it has. In Test workflow, a Wait / Delay step doesn't actually wait; the test shows how long it would pause and carries on.
See the Money FAQ for how refunds and clawback interact.
Marking the order with Add Order Tag / Note
Add Order Tag / Note writes on the order that started the workflow, so whoever opens it in Shopify — or looks it up at the till — sees what happened. Fill in either or both:
- Tags to add — for example
wine-reward-70. Tags the order already has are kept. Shopify allows up to 40 characters per tag; a longer one is shortened to 40. - Note line — for example
Wine reward $70 - NOT REDEEMED ({{ order.name }}). It's added as a new line below the order's existing note; the note already on the order is never replaced.
Both fields can use the same variables as a message — {{ order.name }} is the usual one. Click Insert variable to add one to the note line.
A few things to know:
- Each line is added once. If the order's note already has that exact line — because the same order was processed again, or another workflow wrote the same words — it isn't added a second time.
- Refunds mark the original order. Under Refund Created, the step tags and notes the order that was refunded. For example, a Refund Created workflow set to Full refund only, with an Order contains product condition for your reward product, can add
wine-reward-voidand the lineWine reward VOID ({{ order.name }}); a second one set to Partial refund only can addwine-reward-checkso staff check the reward by hand. - It works after a wait and inside branches. A step placed after Wait / Delay, or on a condition's YES or NO branch, still marks the same order.
- Test workflow shows the tags and the note line it would write (with
#1001as the sample order number) without touching any order.
Tier rewards with Reward Tiers
Reward Tiers pays a reward by the amount a customer spends — and counts their purchases over a time window as one, so splitting a $600 purchase into four $150 orders earns the same as one $600 order, not four times the $150 reward.
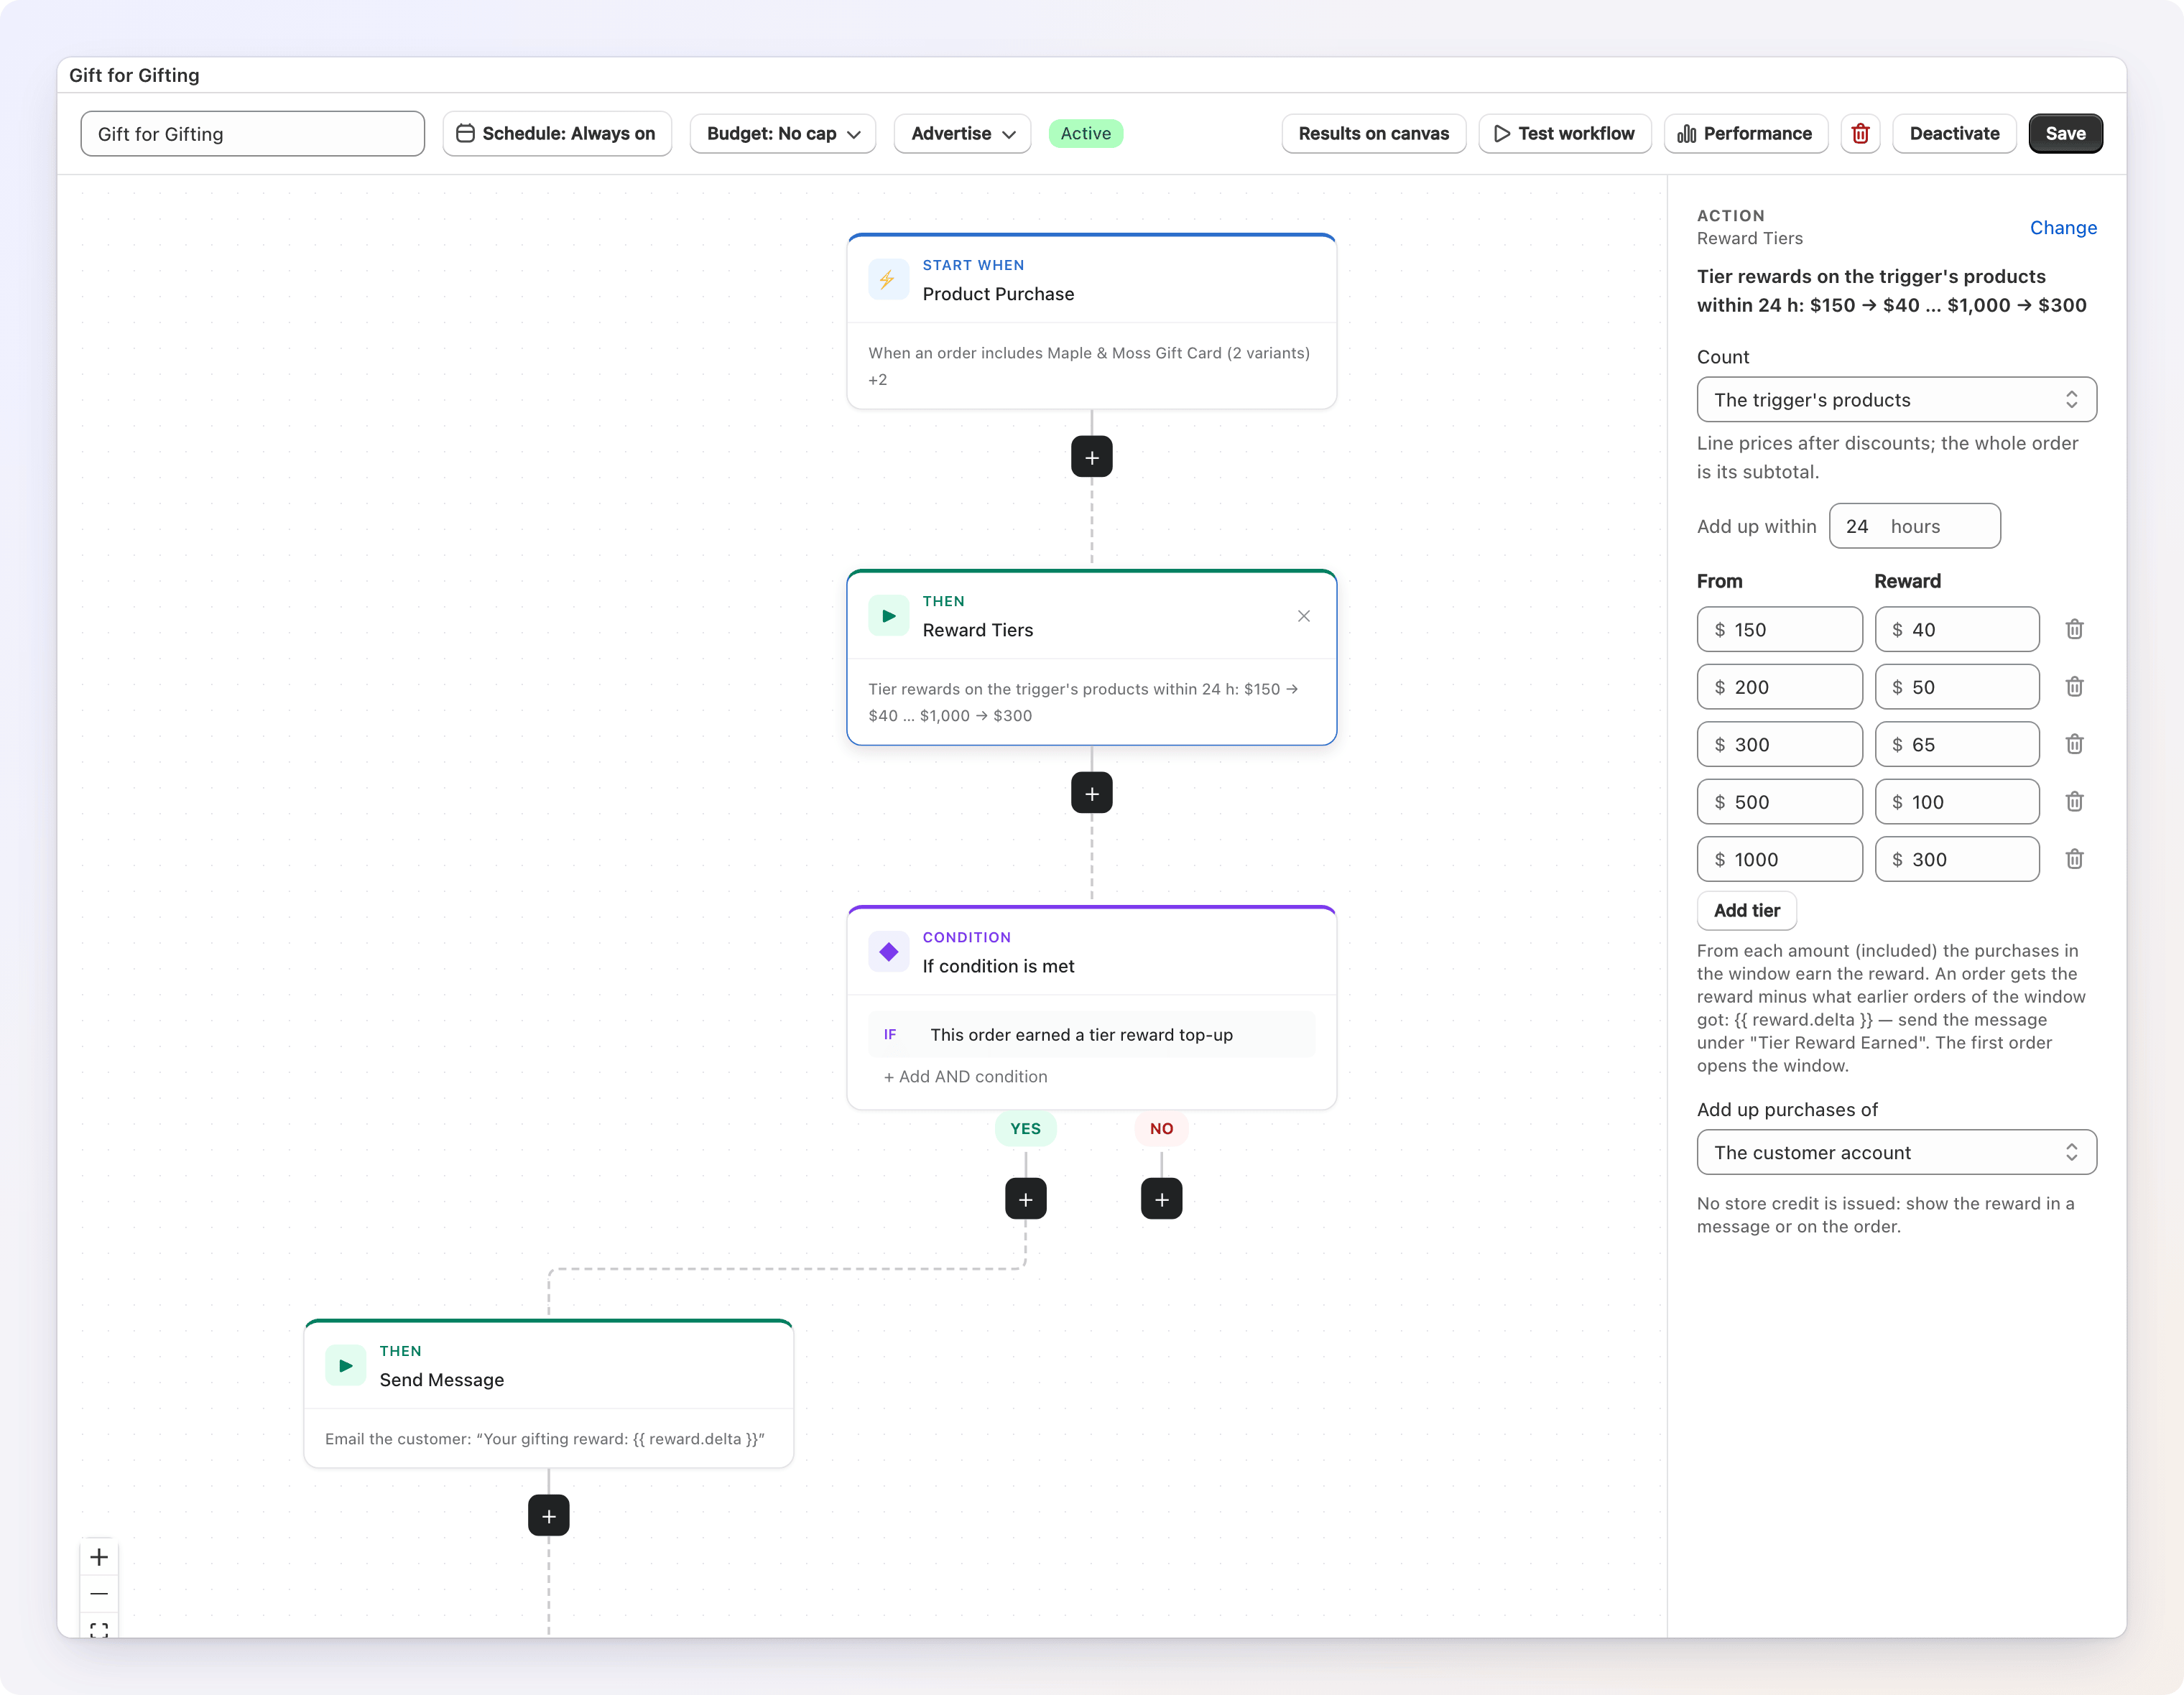
Set it up in the step:
- Count — what an order adds: The trigger's products (under Product Purchase or Collection Purchase, the lines the trigger matched), Chosen products, Products from collections, or The whole order (its subtotal). Line prices count after discounts.
- Add up within — the window, in hours (24 by default, up to 720).
- Tiers — rows of From and Reward: from each amount (included), the purchases in the window earn that reward. For example: from $150 → $40, from $200 → $50, from $300 → $65 … from $1,000 → $300. Click Add tier for another row (up to 50). Rows are sorted by amount; amounts and rewards must be more than zero, two rows can't start at the same amount, and a higher tier can't pay less than a lower one.
- Add up purchases of — the customer account (the default), or the email address on the order.
How the window works: the customer's first qualifying order opens it, and every order until the window's length has passed joins it. An order after that opens a new window. Each order earns the reward of the tier the window has reached, minus what earlier orders of the window already got:
| Order | Window total | Tier reward | This order earns |
|---|---|---|---|
| $150 | $150 | $40 | $40 |
| $150 | $300 | $65 | $25 |
| $150 | $450 | $80 | $15 |
| $150 | $600 | $125 | $45 |
$125 in all — the same as one $600 order.
After the step, use these in a message or an order note: {{ reward.delta }} (what this order earns), {{ reward.amount }} (the tier reward the window reached) and {{ reward.window_total }} (the window's purchases). Put the message and the order mark on the YES branch of a Tier Reward Earned condition, so an order that adds nothing new sends no email:
- Trigger: Product Purchase — Gift Card - Dollar Value
- Reward Tiers — count the trigger's products, within 24 hours, your table
- Condition: Tier Reward Earned — YES: Send Message ("Your wine reward: {{ reward.delta }}") and Add Order Tag / Note (
Wine reward +{{ reward.delta }} ({{ order.name }}))
A few things to know:
- No store credit is issued. The step only works out the amounts; how you hand the reward over is up to the steps after it.
- Processing an order again changes nothing. A retried or duplicate event finds the order already counted and gives it the same result; nothing is earned twice and the message isn't sent twice.
- Refunds lower the reward. When products that counted are refunded, the refunded amount comes off the window total and the reward is worked out again from what is left — see Refunds and Reward Tiers.
- One Reward Tiers step per workflow. It needs an order, so it isn't offered under Customer Signup, Customer Birthday, or Refund Created (use Reward Tiers Refund there).
- Test workflow shows what the order would count, the window total, the tier and the top-up — for an existing customer, including their real orders in the current window — without recording anything.
Refunds and Reward Tiers
The reward is the tier the window's purchases reach, so a refund that lowers the purchases lowers the reward too. This happens on its own for every refund — you don't have to build anything:
- A partial refund brings the reward down to the tier of what is left. A $300 order earned $65; refund $150 of it, and the window holds $150 — the $40 tier — so $25 of the reward is taken off.
- A full refund of the window's only order takes the whole reward off ($65 → $0).
- A refund of one order of several recalculates the whole window: two $150 orders earned $40 and $25; refund the second, and the window is back to $150 — $40 — so its $25 is taken off.
- The next order of the window counts from the lower reward. Refund $150 of a $300 order, then buy $150 more within the window: the window is at $300 again and that order earns $25.
- Only the counted lines matter. A refund of products the step didn't count (the wine, other products), of shipping, or of money without any line items changes nothing.
- A refund is applied once. If Shopify sends the same refund twice, nothing changes the second time.
- The window keeps its start: refunding its first order doesn't move it.
To tell the customer or your staff, add a Refund Created workflow with a Reward Tiers Refund step. It reads what the refund did:
- Reward Tiers workflow — the workflow whose Reward Tiers step counted the order. If your store has only one, it's chosen for you; with several, pick one — the workflow can't be activated until you do.
- After the step:
{{ reward.previous_amount }}(the window's reward before the refund),{{ reward.amount }}(after it),{{ reward.reversed }}(how much was taken off) and{{ reward.window_total }}(the purchases left in the window), plus their_valueversions as plain numbers. - Put the order mark — and a message, if you want one — on the YES branch of Tier Reward Reduced. A refund that leaves the window at the same tier takes nothing off and takes the NO branch.
For example:
- Trigger: Refund Created — Any refund
- Reward Tiers Refund — Gift for Gifting
- Condition: Tier Reward Reduced — YES: Add Order Tag / Note (
wine-reward-reduced,Wine reward {{ reward.previous_amount }} → {{ reward.amount }} ({{ order.name }}))
Test workflow refunds the sample order as if the Reward Tiers workflow had counted it on its own: in full, or half of it under Partial refund only. Add the products the Reward Tiers step counts, with their prices, to the sample.
A reward already handed over is not taken back
Gift Card Hero doesn't know whether the reward was already given — for example, the wine was collected at the till. The new reward is what the purchases are worth now; if the old one was already redeemed, decide at the till using the order note. And if, after such a refund, the customer buys again within the same window, the new order earns its top-up from the lower reward — so they may get more than they actually collected. With a 24-hour window this is rare, but worth knowing.
Send a message
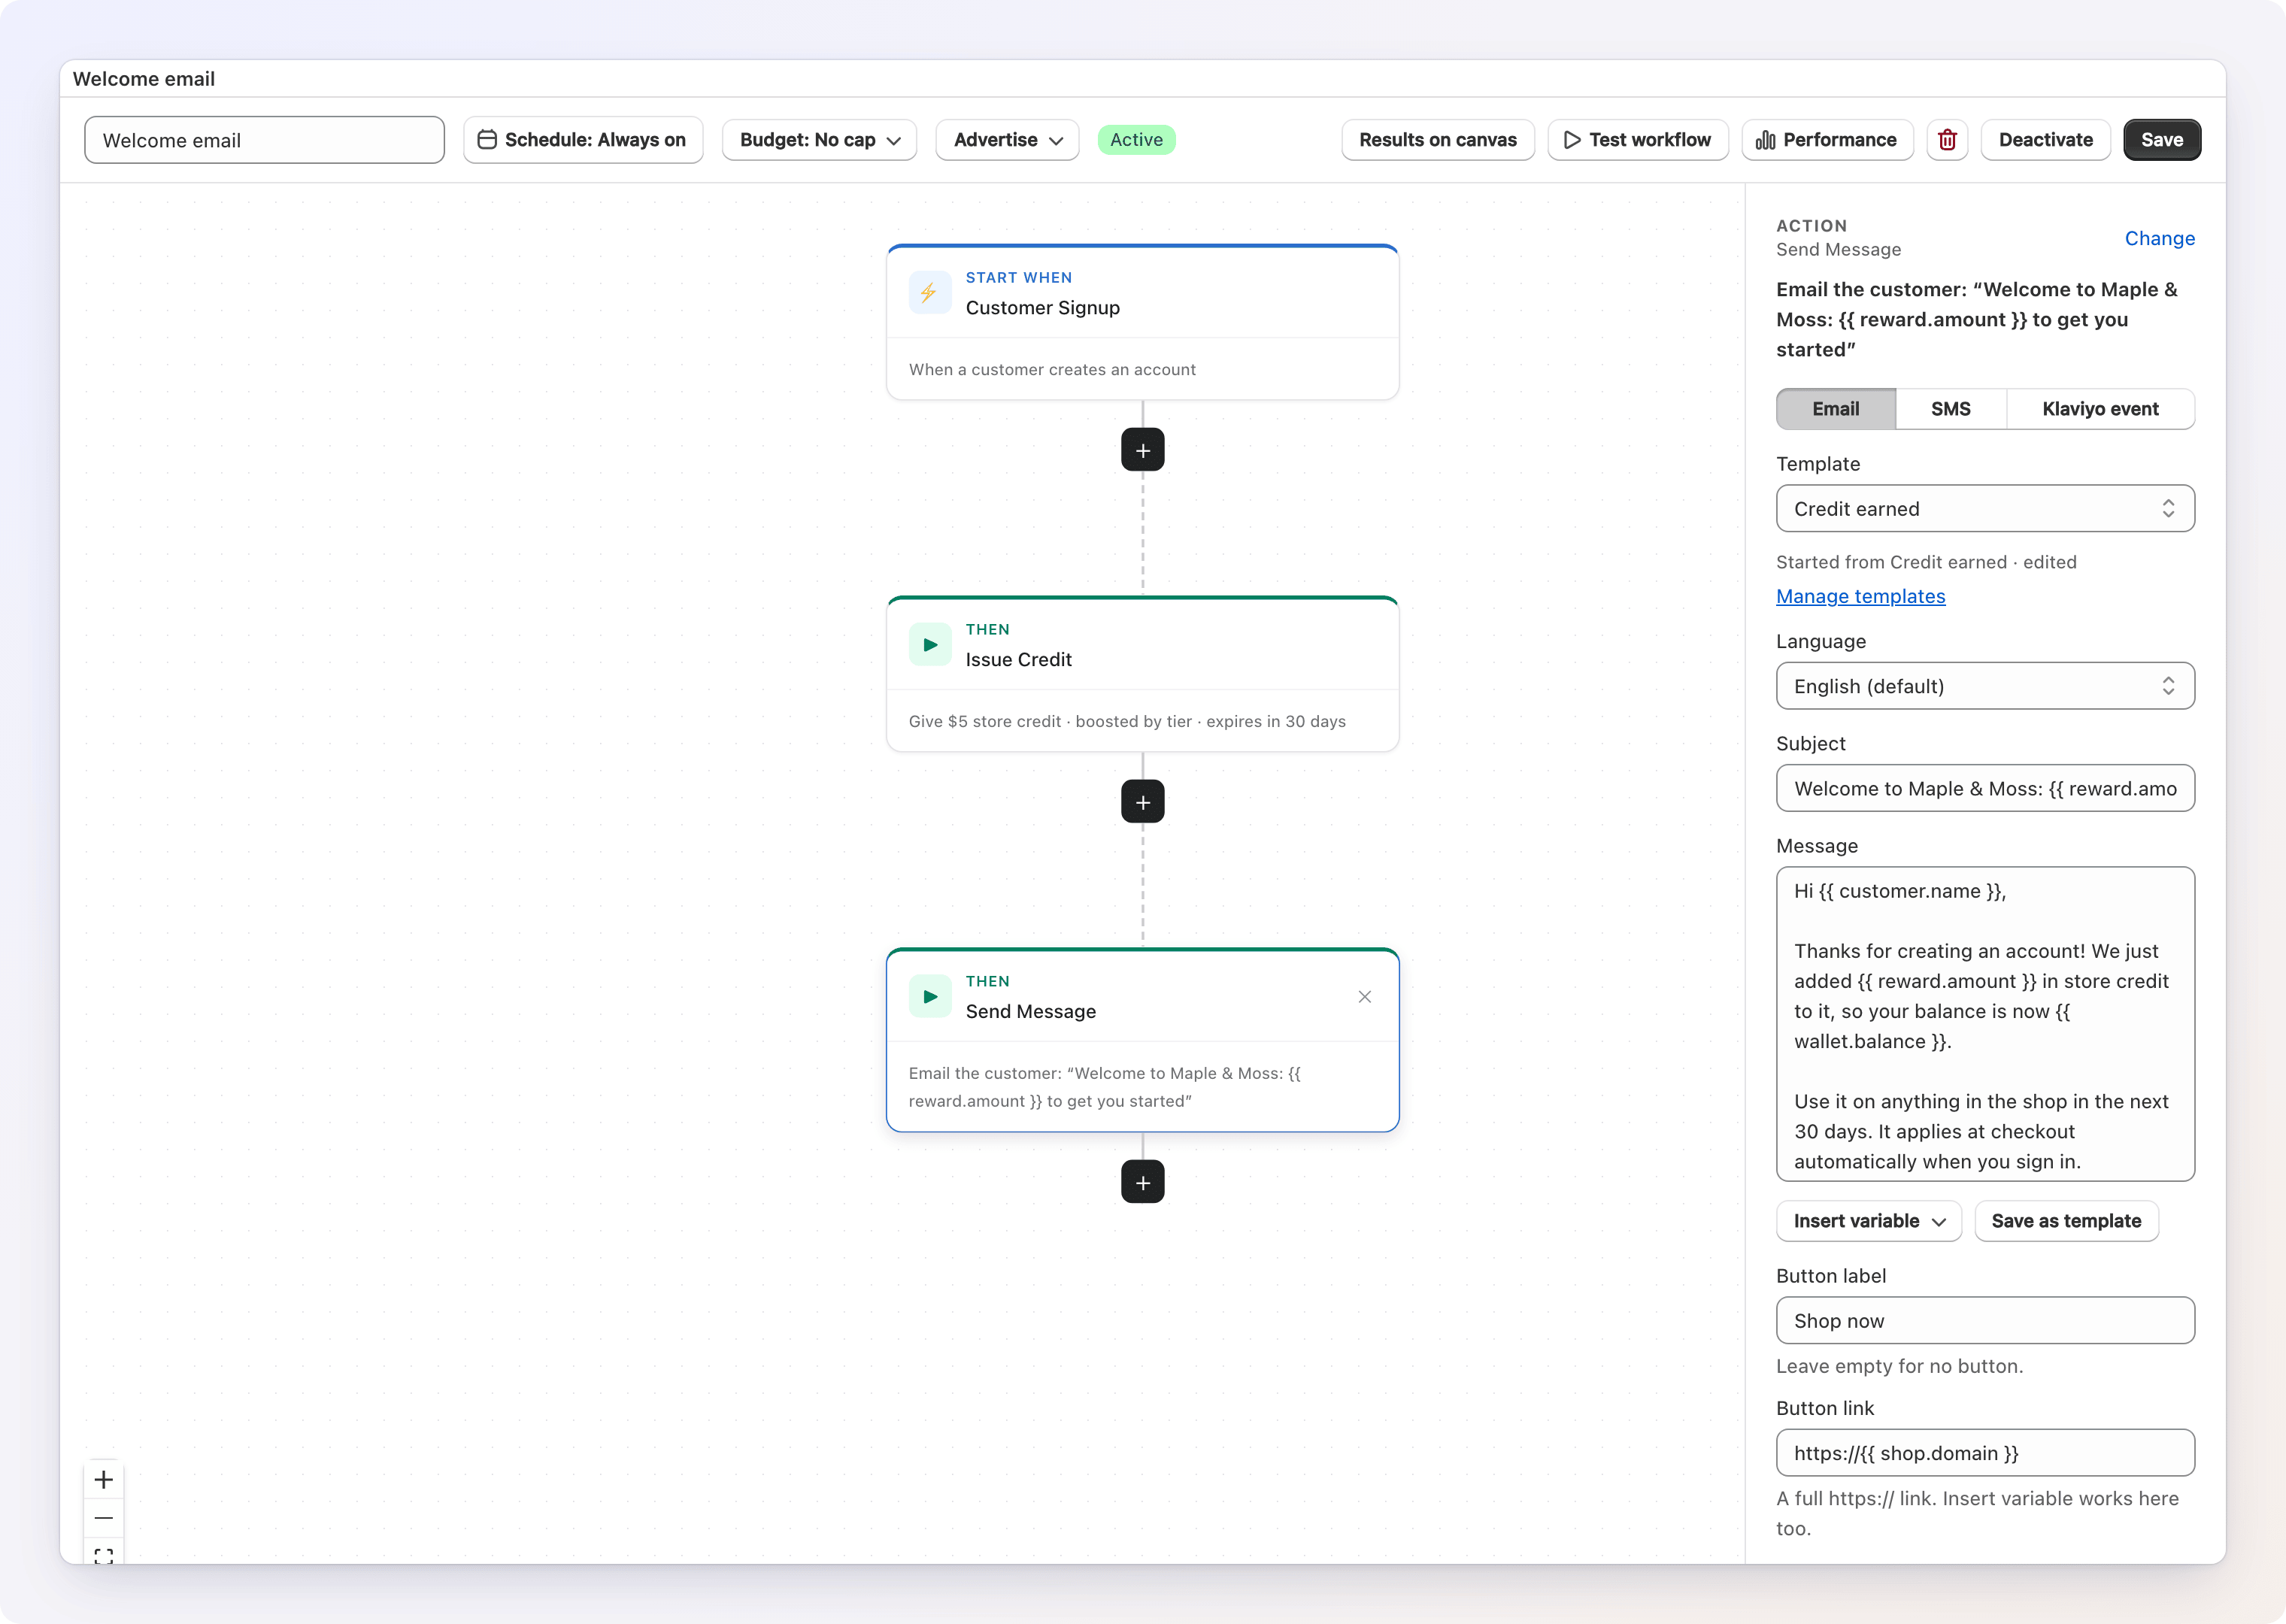
The Send Message action reaches the customer on one channel at a time: email, SMS, or a Klaviyo event. Pick the channel, write (or choose) the message, and the rest of the workflow keeps running whatever happens to it — a message is a side effect, not a gate.
In-app messages aren't available
There's no in-app notification channel. A step left over from an early version that was set to In-app notification never delivered anything; the editor shows such a step as Email. Pick a channel to send for real.
Choosing a channel
| Channel | What it needs |
|---|---|
| Sends from Gift Card Hero email by default, or from your own mail server once you pick it as Send from — see Delivery below. Nothing extra to connect to use Gift Card Hero email. | |
| SMS | Needs an SMS provider connected under Settings → Integrations (Onfon Media today). |
| Klaviyo event | Needs Klaviyo connected under Settings → Integrations. Gift Card Hero sends the event; a Flow you build in Klaviyo sends the actual message. |
See Integrations to connect any of these.
A workflow can't activate with a channel that isn't ready
Activate is refused, on the Send Message step itself, when that step sends SMS without a connected provider, a Klaviyo event without Klaviyo connected, or email through a mail server that isn't set up. Saving as a Draft is always allowed, so you can build the rest of the workflow first. Pick a channel that isn't connected and the panel shows a warning with a button that opens Settings → Integrations in a new tab.
Writing the message
- Email — start from a template and edit the subject, message and button freely. See Email: templates and editing below.
- SMS — one Text message field, pre-filled with a short built-in text the first time you switch to SMS.
- Klaviyo event — a Klaviyo event name (optional; see below) and a read-only list of the properties the event carries. There's no message text to write — your Klaviyo Flow composes what the customer sees.
On Email and SMS, click Insert variable to drop a variable at the cursor instead of typing it out. A live Preview underneath shows the rendered message — subject, text and the button for email, the text and its segment count for SMS, the event name and its properties for Klaviyo — updating a moment after you stop typing.
Email: templates and editing
Every field is yours to edit, whatever you start from — there's no read-only "built-in" state once you've typed anything.
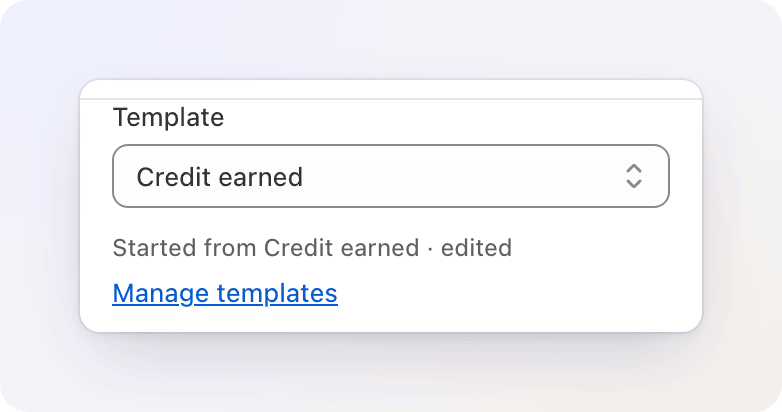
The Template select lists the four built-ins — Credit earned, Tier changed, Credit expiring, Birthday reward — then Your templates, the ones you've saved before, then Blank. Manage templates opens Loyalty emails in a new tab.
The built-in names are starting texts, not triggers
A workflow sends Tier changed or Credit expiring wording only when your trigger and steps make it send — there is no trigger that fires on a tier change or on expiring credit. To announce a new tier, for example, put a Send Message right after an Update Tier step. Gift Card Hero also sends its own reminder before credit expires — see the Money FAQ.
- Pick a template while Subject and Message are untouched, and it fills them in right away.
- Pick one once you've written your own text, and Gift Card Hero checks first: "Replace your subject and message with the [template] template?" — Replace fills the fields, Cancel leaves your text as it was.
The first edit you make to a built-in's subject, message or button copies that template's text into the step — typing never touches the built-in itself, or any other step that uses it. From then on, Started from [name] · edited appears under the Template select, telling you this step now holds its own copy. If it started from a saved template that's since been deleted, it reads Started from a deleted template instead.
Click + Add a button to add one under the message: a Button label (for example "Shop now") and a Button link, which must be a full https:// address — Liquid works there too, so https://{{ shop.domain }} sends customers to your storefront. Leave the label empty and there's no button. The four built-ins already carry a Shop now button to your storefront.
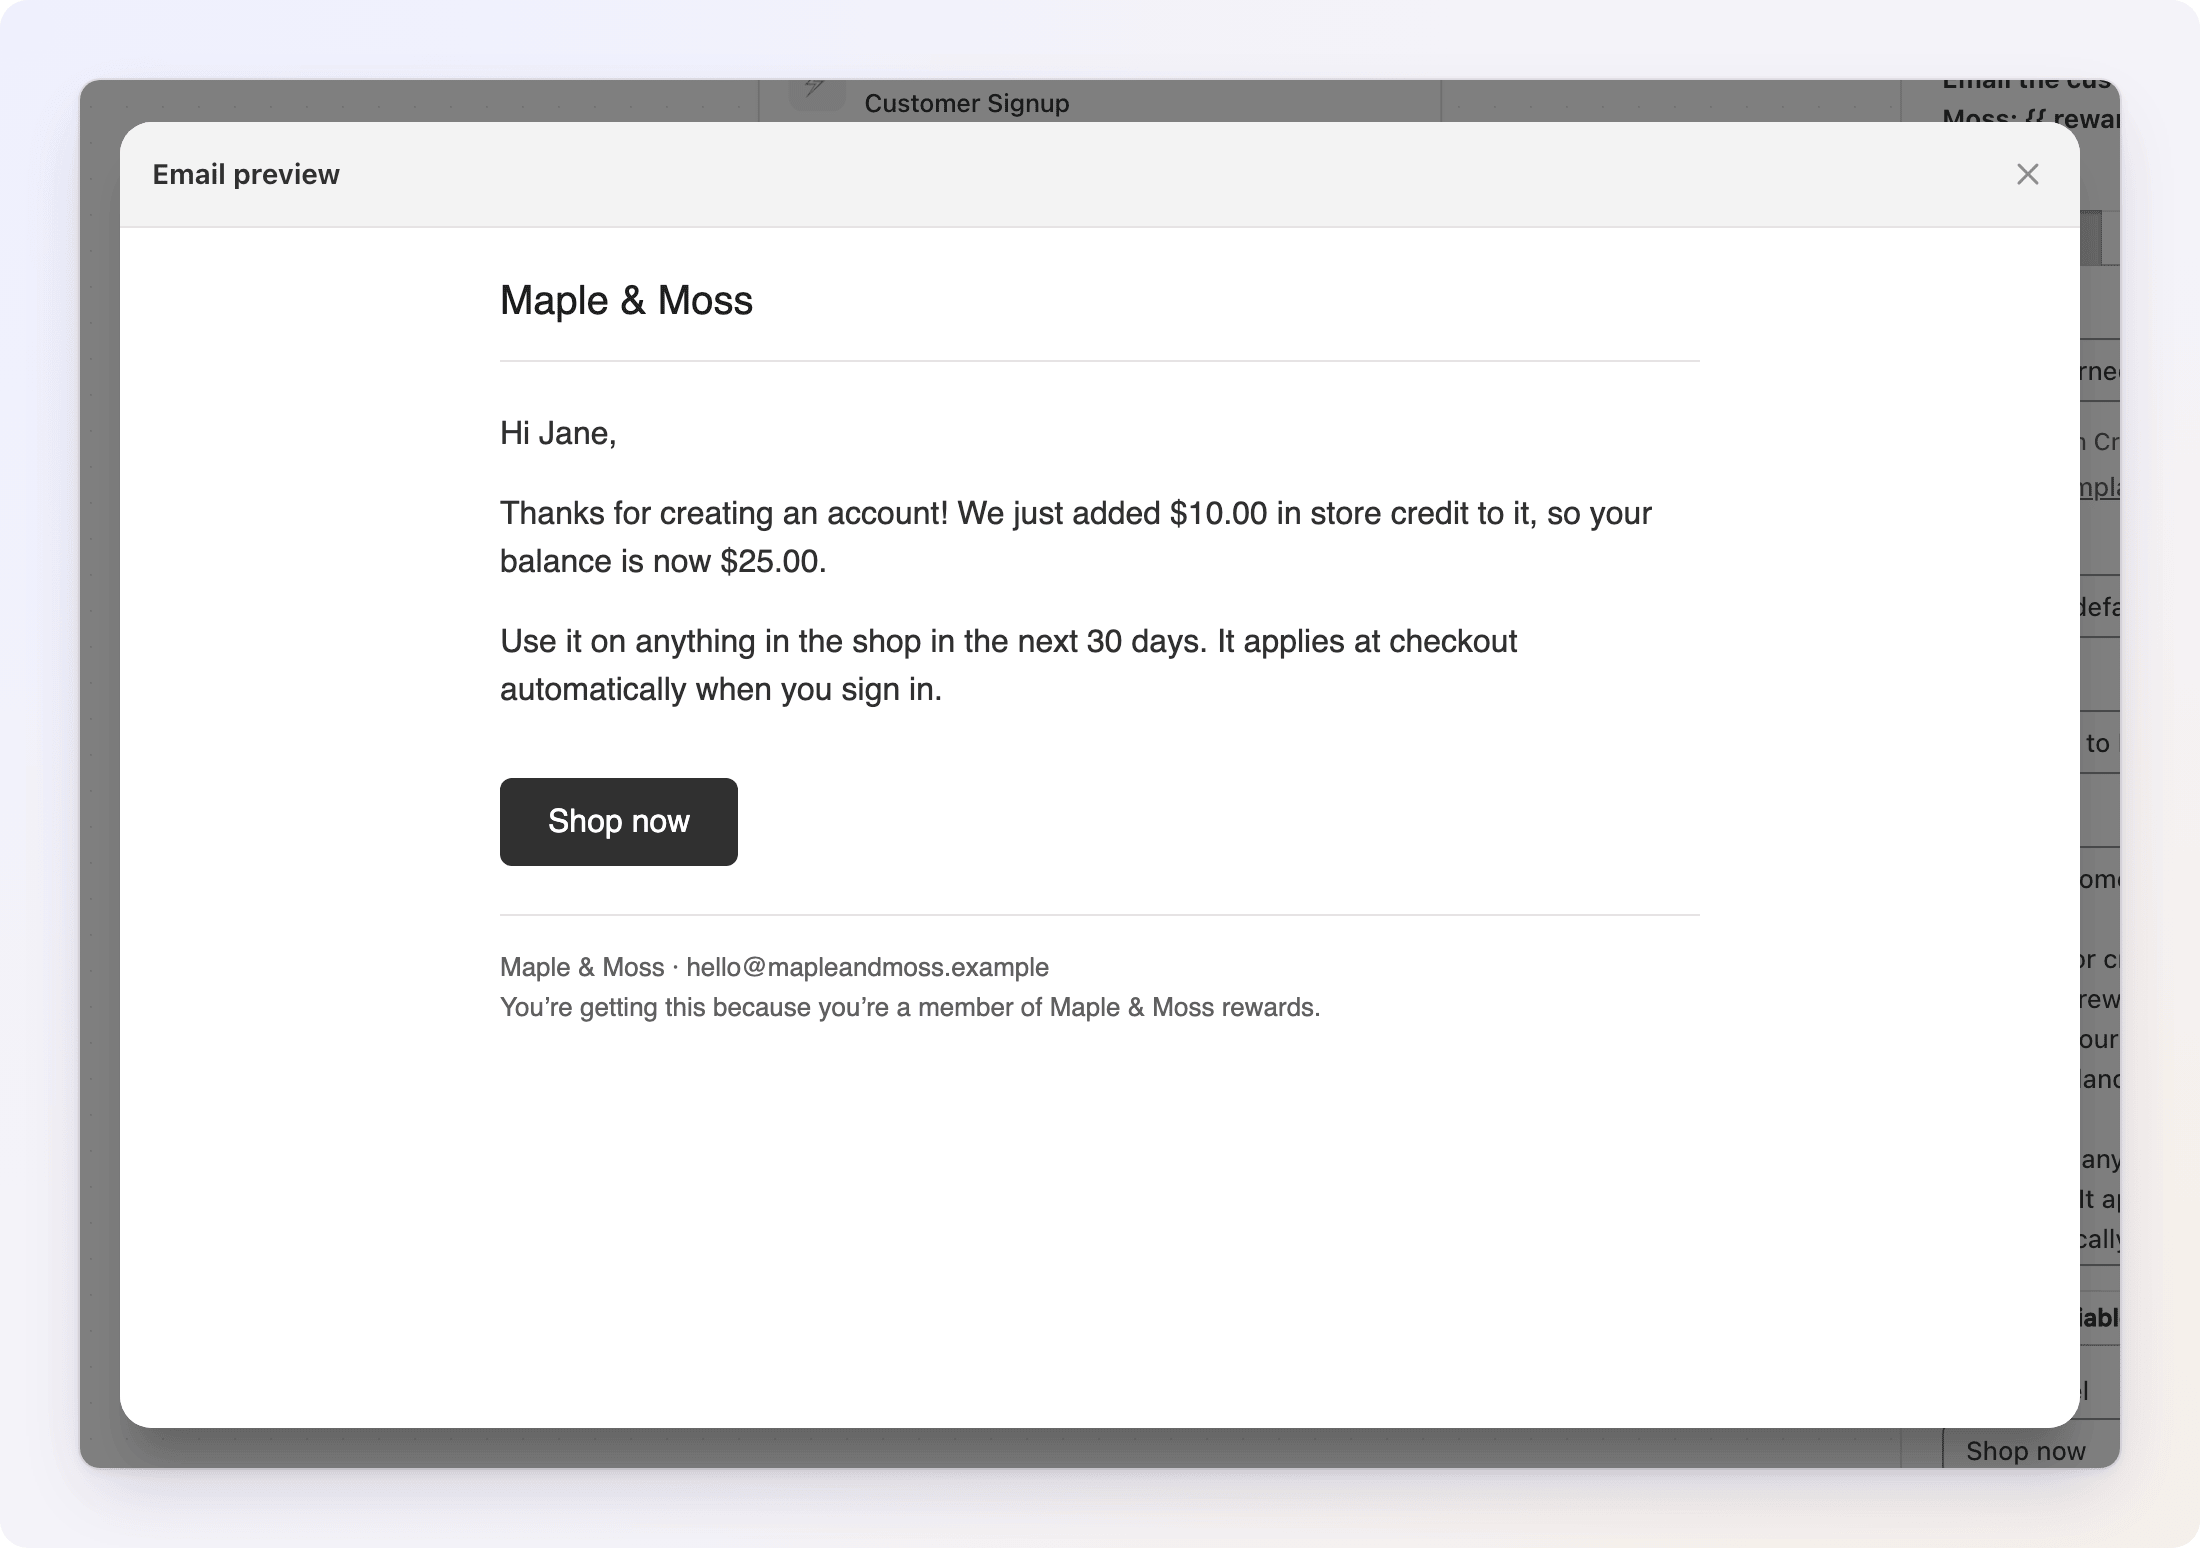
Click View email to see the message exactly as a customer receives it: your store name at the top, the message, the button if there is one, and a footer naming your store's name and email.
Save as template stores the step's current subject, message and button (and their translations) under a name of your choice, so the next workflow can start from it instead of a blank page — manage saved templates on Loyalty emails. A step that starts from a saved template keeps its own copy: editing or deleting the saved template afterward never changes an email already sitting in a workflow.
Languages
If your store publishes more than one language in Shopify, an email or SMS step gets a Language select above the text. The first entry is your store's main language, marked (default); every other published language shows how far its translation is — translated, incomplete, or uses default.
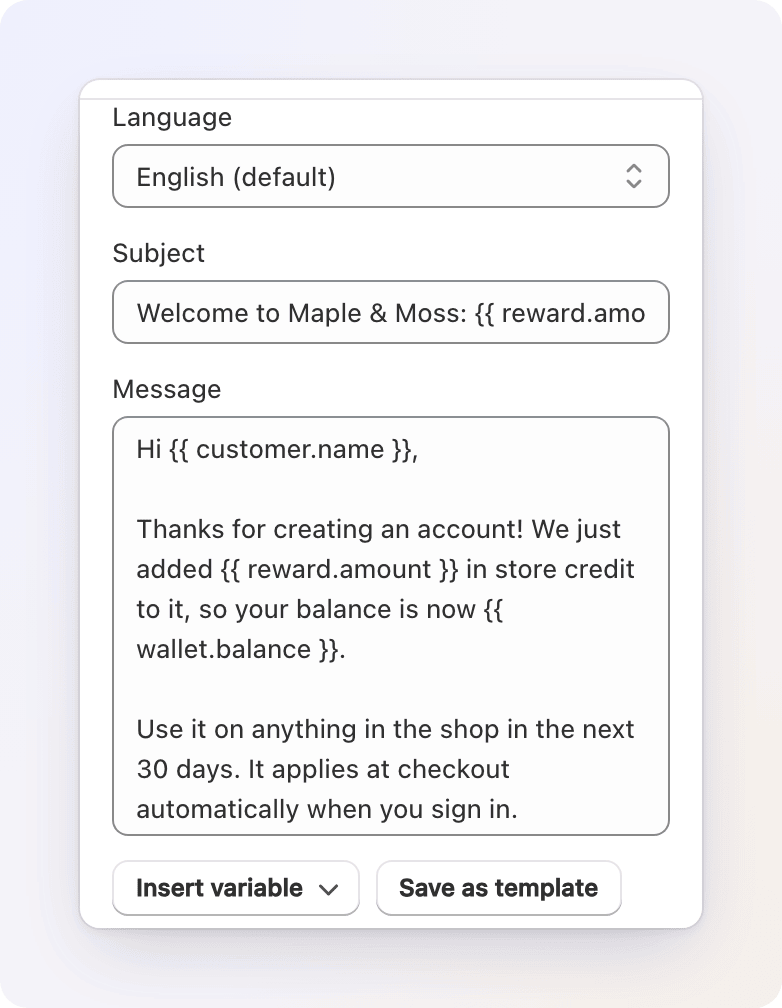
Pick a language to write its subject, message and button label (or its text message). An empty field shows the default text greyed out, with Falls back to English. The button's link is the same in every language.
When the message goes out, Gift Card Hero uses the customer's language as Shopify has it. It looks for an exact match (pt-BR), then the language alone (pt), and otherwise sends the default. An email is never half-translated: a translation is used only when it has both a subject and a message, otherwise the whole email goes out in the default language. The editor says so under the field. Klaviyo events have no translations — your Flow handles language.
Variables
| Variable | What it holds | Example |
|---|---|---|
customer.first_name |
The customer's first name | Jane |
customer.last_name |
The customer's last name | Doe |
customer.name |
A name to greet with: the first name, or "there" when it's unknown | Jane |
customer.email |
The customer's email address | jane.doe@example.com |
customer.phone |
The customer's phone number, in international format | +254712345678 |
customer.locale |
The customer's language as Shopify reports it; empty when unknown | fr |
reward.amount |
Store credit this workflow issued earlier in this run, in your money format; empty if none. After a Reward Tiers step: the reward of the tier the purchases reached. After a Reward Tiers Refund step: the reward left after the refund | $10.00 |
reward.amount_value |
The same amount as a plain number | 10 |
reward.delta |
Reward Tiers: what this order earned — the tier reward minus what earlier orders in the window got (Reward Tiers workflows only) | $10.00 |
reward.delta_value |
The same as a plain number (Reward Tiers workflows only) | 10 |
reward.window_total |
Reward Tiers: what the customer's purchases in the window add up to, this order included; after a refund, what is left (Reward Tiers workflows only) | $150.00 |
reward.window_total_value |
The same total as a plain number (Reward Tiers workflows only) | 150 |
reward.previous_amount |
Reward Tiers Refund: the window's reward before the refund (refund workflows with a Reward Tiers Refund step only) | $25.00 |
reward.previous_amount_value |
The same as a plain number (Reward Tiers Refund only) | 25 |
reward.reversed |
Reward Tiers Refund: how much the refund took off the reward — the reward before minus the reward after (Reward Tiers Refund only) | $15.00 |
reward.reversed_value |
The same as a plain number (Reward Tiers Refund only) | 15 |
wallet.balance |
The customer's store credit balance, in your money format | $25.00 |
wallet.balance_value |
The balance as a plain number | 25 |
wallet.currency |
Currency of the balance | USD |
tier.name |
The customer's loyalty tier; empty without one | Silver |
tier.next_name |
The next tier up; empty at the top tier or without tiers | Gold |
tier.spend_to_next |
What the customer still has to spend to reach the next tier, in your money format | $150.00 |
tier.spend_to_next_value |
The same, as a plain number | 150 |
order.name |
The order number (order triggers only) | #1001 |
order.total |
The order total, in your money format (order triggers only) | $120.00 |
order.total_value |
The order total as a plain number (order triggers only) | 120 |
trigger.matched_amount |
What the products or collection items the trigger matched add up to, after discounts, in your money format (Product / Collection Purchase triggers only) | $100.00 |
trigger.matched_amount_value |
The same amount as a plain number (Product / Collection Purchase triggers only) | 100 |
workflow.name |
The name of this workflow | Your workflow |
shop.name |
Your store name | Your Store |
shop.domain |
Your storefront domain | your-store.com |
shop.email |
Your store's contact email | hello@your-store.com |
Four variables from before these messages used Liquid still work in any message you haven't rewritten: {{amount}}, {{balance}}, {{customer_name}}, and {{store_name}} — the same values as reward.amount, wallet.balance, customer.name, and shop.name. Write new messages with the table above.
Liquid basics
A message is a small Liquid template. Two things cover almost everything a merchant needs:
- Print a variable with double curly braces:
Hi {{ customer.first_name }}, your balance is {{ wallet.balance }}. - Show something only sometimes with
{% if %}…{% endif %}:
{% if reward.amount_value > 0 %}You also earned a reward on this order!{% endif %}
Nothing between the tags is shown when the condition is false — no blank line, no leftover punctuation.
A message with a Liquid mistake can't be saved: the builder points at the field and says what's wrong.
SMS length and segments
A text message is billed by the segment: a plain-language message fits 160 characters in one segment, and 153 characters each after that. One character outside the basic Latin alphabet — an emoji, a curly quote, many accented letters — switches the whole message to a mode that only fits 70 characters per segment (67 after the first), so a single stray character can double what a message costs. The count under the Text message field is the length of what you typed, against the 1,000-character limit. How many segments the message takes is shown in the preview: it counts the rendered text — after variables are filled in with sample values, not the {{ }} tags themselves — so a long customer name or amount can still add a segment.
Delivery
Every channel ends with a Delivery group at the bottom of the panel — how the message leaves, and who's allowed to get it.
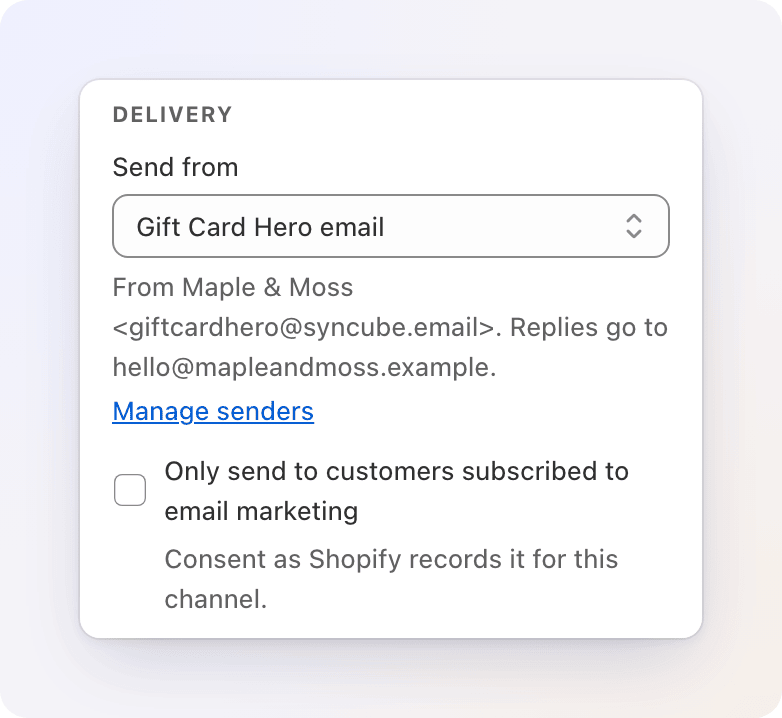
Send from (email only) is the pipe the email leaves through:
| Option | Sends as |
|---|---|
| Gift Card Hero email | <Your store name> <giftcardhero@syncube.email>, with replies going to your store's email. Always available. |
| Your mail server (SMTP) | The address set up for it in Settings → Integrations. Shown as "— not set up" and disabled until a mail server is connected there. |
Manage senders opens Settings → Integrations in a new tab. A step saved before this choice existed keeps following your store-wide email setting — see Integrations — until you pick a sender for it here.
If the mail server a step is set to use stops working, the email still goes out — from Gift Card Hero email instead — and the step's result says so. A Send test through a broken mail server fails outright instead of falling back, with "Your mail server isn't set up", so you find out before a customer does. A workflow can't be activated while an email step's chosen mail server isn't set up — see the warning above.
For SMS and Klaviyo, this group shows the connection status instead of Send from — whether a gateway or Klaviyo is connected.
Every channel also has its own consent checkbox here: "Only send to customers subscribed to SMS marketing" for SMS, or "Only send to customers subscribed to email marketing" for email and Klaviyo. It reads the customer's marketing consent exactly as Shopify records it for that channel.
It's on by default for SMS and off for email and Klaviyo — and switching the channel resets it to that default, even if you'd changed it before. Turn it off for SMS only if you're certain every recipient has agreed to be texted; transactional reward messages still cost a segment either way.
The Klaviyo event and building the Flow
A Klaviyo step sends an event (metric), not a message — your Klaviyo account turns that event into whatever your Flow sends. The event name defaults to Loyalty: <workflow name>; type your own (up to 128 characters) to target a specific Flow, which is useful when more than one Send Message step in your account feeds Klaviyo.
The event carries every variable from the table above (not the four legacy ones) as a property, plus workflow_id, step_id, and is_test. It's attached to the customer's profile by email — a customer with no email on file can't receive a Klaviyo event.
Build a Flow in Klaviyo triggered by this metric the same way you would for reminders or redemption notifications — an event with no Flow behind it reaches Klaviyo and then does nothing.
Sending a test
Two different things send a test, for different purposes:
- Test workflow, in the toolbar, runs the whole workflow as a dry-run. For a Send Message step it shows the rendered subject and text (or the Klaviyo event and its properties) and the masked recipient — and contacts no email, SMS, or Klaviyo provider.
- Send test, inside the Send Message action's own editor, sends a real message — with sample customer, reward, and wallet values — to an email address or phone number you type in; for email it starts prefilled with your store's own address. An SMS test is a real, billed message. An email test always goes out through the step's own sender and never falls back to another one — if that sender isn't set up, the test fails outright, with "Your mail server isn't set up", and a successful one confirms both the address and the sender it used. A Klaviyo test sends a real event, carrying
is_test: true, to the email you type, so you can finish building your Flow against it. Send test is disabled until the channel it's testing is connected. If the step has translations, the test goes out in the language currently selected.
When a message isn't sent
A Send Message step never stops the rest of the workflow — whatever happens to the message, the steps after it still run. It's also sent at most once per step per order or event: a retried job or a repeated webhook from Shopify never sends the same message twice.
When a message wouldn't go out, Test workflow says why, right on that step. For live runs the same reason is recorded for the step, but the admin doesn't list individual live runs — use Test workflow with the same customer to reproduce it.
| What it says | What happened |
|---|---|
| no email address is known for this customer | The channel is email or Klaviyo, and the customer has no email on file. |
| no usable phone number is known for this customer | The channel is SMS, and no usable phone number could be found for the customer. |
| the customer is not subscribed to SMS marketing / email marketing | The consent checkbox in Delivery is checked on this step, and Shopify doesn't have the customer marked as subscribed on that channel. |
| no SMS gateway is connected (Settings → Integrations) | The SMS provider isn't connected — or was disconnected after this step was turned on. |
| Klaviyo is not connected (Settings → Integrations) | Same, for a Klaviyo step. |
| the message shows the reward amount, but this run issued no store credit | The message prints {{ reward.amount }} (or the legacy {{amount}}, or reward.delta / reward.window_total / reward.previous_amount / reward.reversed) somewhere, and this particular run didn't add any credit — so a customer is never told they earned "$0.00". Testing reward.amount_value in an {% if %} without printing the amount (as in the Liquid basics example) avoids this. After a Reward Tiers step this never applies — branch on Tier Reward Earned instead; after a Reward Tiers Refund step, on Tier Reward Reduced. |
| already sent for this event by an earlier attempt | A retry or a duplicate webhook tried to send the same step's message again. |
A message can also fail — the provider rejected it, or the template didn't render — and the step's result shows the error Gift Card Hero got back.
Branching example
A common pattern rewards big orders more generously:
- Trigger: Order Complete
- Add a condition: Order Amount is more than
100 - On the YES branch, add Issue Cashback at
10% - On the NO branch, add Issue Cashback at
5%
When you drop a condition into the middle of an existing chain, the steps that came after it move onto the YES branch automatically.
Validating and saving
The Save button stays disabled until the workflow is valid — it needs a name, a trigger, and at least one step.
When you save, Gift Card Hero also checks each step's settings. If a required field is missing or a number is out of range (for example, a percentage must be between 0.1 and 100), the builder shows an error banner and highlights the specific field to fix. Correct it and save again. The same goes for a trigger amount range whose upper amount isn't above its lower one — no order could ever match it — for a Reward Tiers table with an empty, zero, repeated or decreasing row, and for a schedule that ends before it starts.
The first time you save a new workflow it's a Draft. Changes to a workflow that's already Active take effect as soon as you save.
The toolbar

On the left: the workflow name, then Schedule, Budget, Advertise, and the status badge (plus Unsaved whenever you have changes that aren't saved).
- Schedule: Always on — optionally limit the workflow to a window. Pick a start and end date and time (or a preset such as Next 30 days); leave the end empty for no end; click Always on to clear it. The workflow rewards an event only if the event happened inside the window — so an order placed before the end date still earns even if it's processed a little after. The end must be after the start. Outside the window the badge reads Scheduled (not started yet) or Ended.
- Budget: No cap — a Monthly budget cap for this workflow. Once the credit it has issued in the calendar month (UTC) would go over the cap, the workflow stops issuing credit and is paused. Empty means no cap. A store-wide cap and a per-customer cap are set on the Settings page of Loyalty — see the Money FAQ.
- Advertise — create or link a storefront promotion; see Advertising a workflow's reward. It's disabled until the workflow is saved.
On the right, once the workflow has been saved once:
- Results on canvas — shows run counts on each step of the canvas.
- Test workflow — see Test workflow (dry-run).
- Performance — see Performance.
- Delete (the trash icon) — see Deleting.
- Activate / Deactivate — see Activate, deactivate, and status.
- Save — always shown.
Test workflow (dry-run)
Before activating — or any time you change a live workflow — simulate it. Nothing is issued and no message is sent — by email, SMS, or Klaviyo. The test runs the canvas exactly as it stands right now, including edits you haven't saved yet. Test workflow appears once the workflow has been saved for the first time.
- Click Test workflow in the toolbar.
- Choose who to test as. New customer is the default: a first-time shopper with no tags, no tier and nothing spent. Choose Existing customer to type a Email; Gift Card Hero looks the customer up, shows a green badge with their name, tier and order count, and fills in their real tags, tier and spend.
- Fill in the order. The dialog shows only the fields your workflow actually reads — a line at the top, "This workflow checks…", lists them. Subtotal is always there for order triggers; others (Customer tags, Tier, Lifetime spent, Treat as this customer's first order, Order total, Discount, Products) appear when a condition needs them. Everything else is under More options. When a trigger or Reward Tiers step works with product amounts, give each sample product a Price too.
- Click Run test in the dialog's title bar.
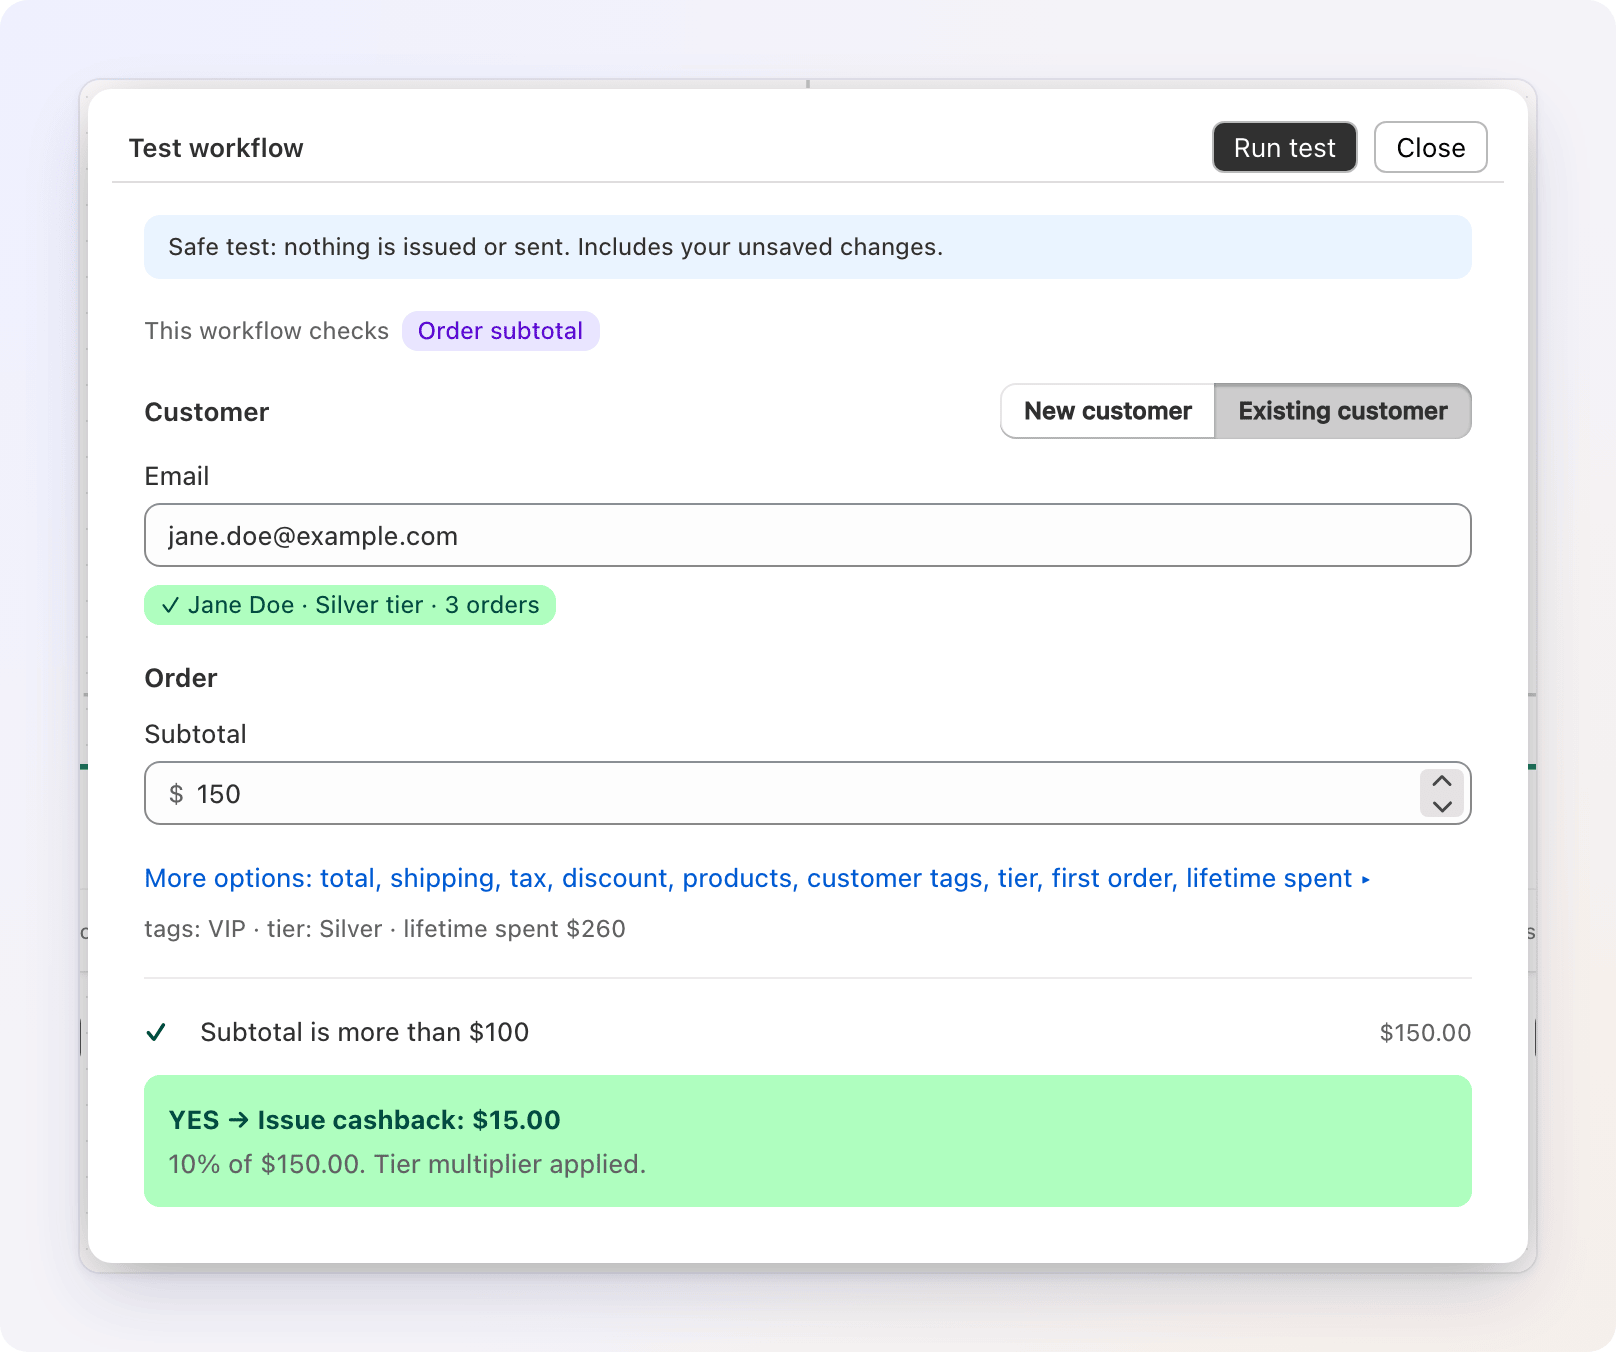
The result lists the checks the workflow made (and whether each took the YES or NO branch), then what each action would do. A Send Message step shows what it would send, and to whom (masked) — see When a message isn't sent for the wording when it wouldn't go out. A green box at the bottom shows the credit the customer would have received; if none, it says No credit would be issued and why. If the trigger's own filter wouldn't match (say, the order is below your minimum amount), the test says Workflow would not run and why.
Simulate 'as if' customers
Change the Tier, Treat as this customer's first order, or Lifetime spent fields to test as though a customer were in a certain tier, on their first order, or at a given spend — without needing a real customer who already matches.
A test also respects your spending limits: if a cap would block the reward, the test shows it blocked.
Activate, deactivate, and status
A workflow has one of three statuses you choose, shown as a badge:
- Draft — new and not yet running.
- Active — live and running on real events.
- Inactive — saved but paused.
Two more labels are worked out from the schedule and the limits: Scheduled and Ended (see The toolbar), and Paused by guardrail in the workflow list when a budget cap stopped the workflow. A guardrail pause shows as Inactive in the builder, with a Paused by guardrail banner that explains which cap was reached and has a Reactivate button; reactivating doesn't raise the cap, so the workflow may pause again.
Click Activate to turn a workflow on, or Deactivate to pause it. Save your changes first — Activate acts on the saved workflow. Activating and deactivating can take a moment because Gift Card Hero connects (or disconnects) the underlying Shopify event behind the scenes.
Activate is refused, with the problem shown on the step, when:
- a step needs data the trigger doesn't have (for example Add Order Tag / Note under Customer Signup);
- a Reward Tiers Refund step has no Reward Tiers workflow to read, or several and none chosen;
- a Send Message step uses a channel or sender that isn't connected (see Send a message).
Turning a workflow off with orders in progress
An order can still be on its way through a workflow — queued for processing, or waiting at a Wait / Delay step. When you click Deactivate and some are pending, Gift Card Hero lists them (order, customer, and "waiting N min" or "continues in 3 days") and asks:
- Turn off, finish these — the default. The listed orders still get this workflow's rewards.
- Turn off and cancel these — those orders never get this workflow's rewards. This can't be undone.
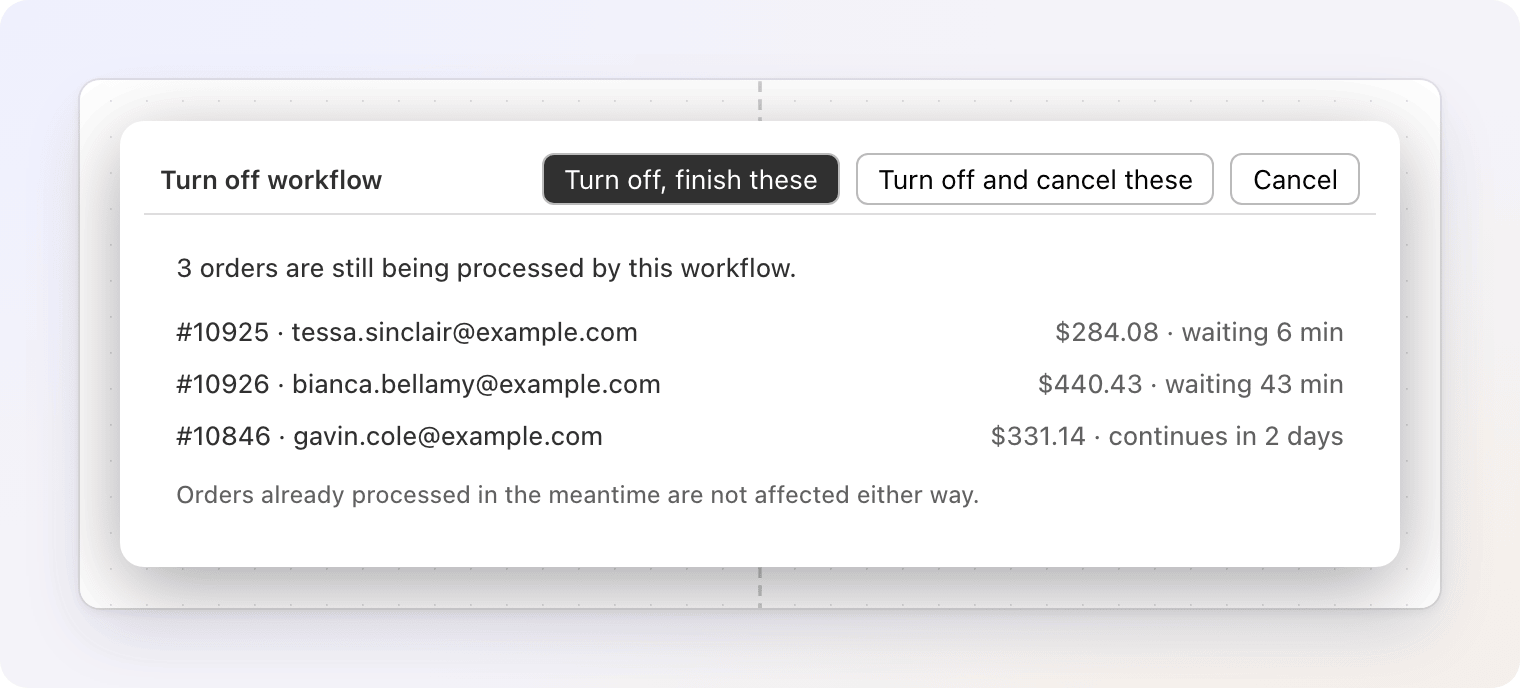
If you chose to finish them, an Inactive workflow keeps showing a banner while any remain, with Cancel them (after a confirmation) and Refresh. Orders already processed aren't affected either way.
Performance
Performance swaps the config panel for a summary of how the workflow has run. Switch between 7d, 30d, 90d, and All. It shows Runs (and how many took an action), Customers rewarded, Net credit (issued, minus credit taken back by refunds, minus credit that expired), Orders rewarded, and two estimates — Credit spent (the share of issued credit customers have used) and Revenue from orders that used it — plus a runs-per-day chart. If a spending limit blocked rewards, a banner says so, with details and links to the orders.
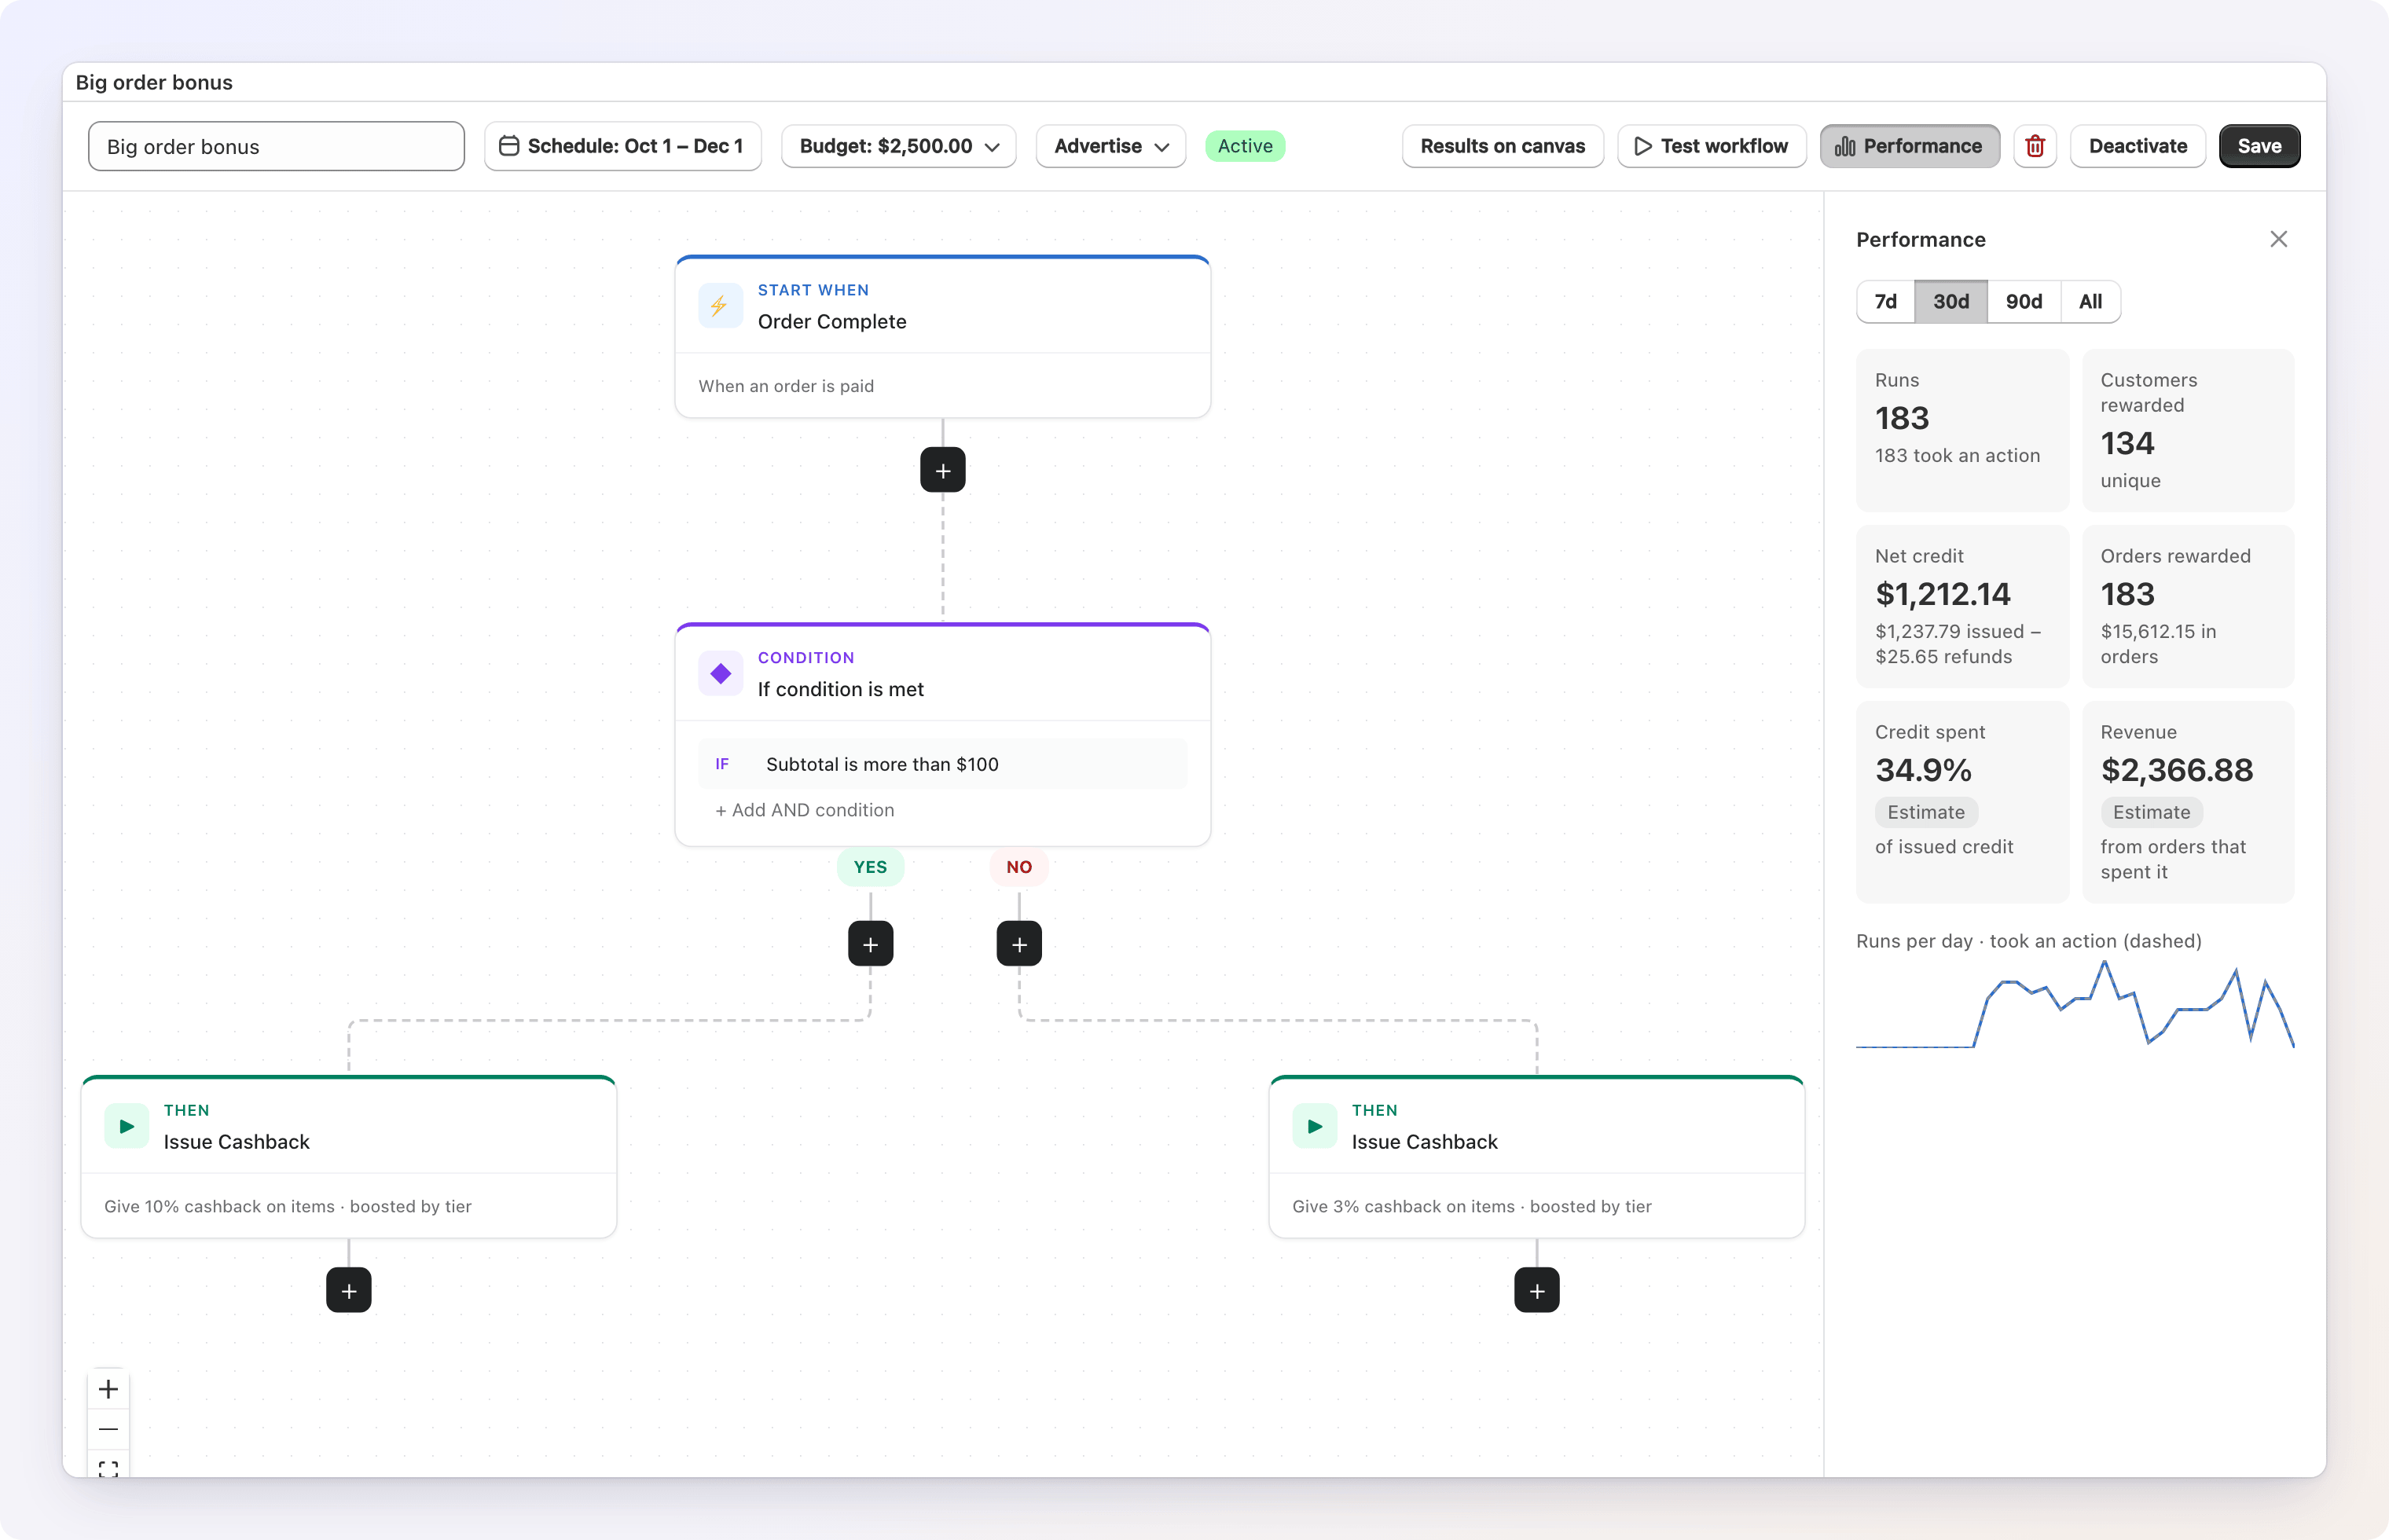
Results on canvas adds the counts to the steps themselves. For the numbers across all workflows, see Loyalty analytics.
Deleting
The trash icon removes the workflow permanently after you confirm. If it's active, its underlying Shopify events are disconnected first. Orders still in progress are cancelled — the confirmation tells you how many. A promotion linked to the workflow becomes a draft and stops showing, but stays in your promotions list. This can't be undone. You can also select several workflows in the Loyalty Workflows list and use Delete workflows.
Advertising a workflow's reward
Building a workflow doesn't automatically tell anyone about it. Click Advertise in the toolbar (once the workflow is saved and has no unsaved changes) to create or link a promotion — a pop-up nudge card and/or a banner shown on your storefront, with reward numbers pulled live from the workflow. Only workflows that issue credit or cashback can be advertised. See The Promotions widget.