Bulk Operations
Bulk operations let you create and distribute large numbers of gift cards in one job, without issuing them one at a time.
Open them from Bulk actions in the app menu, or click Open bulk tools on the home page.
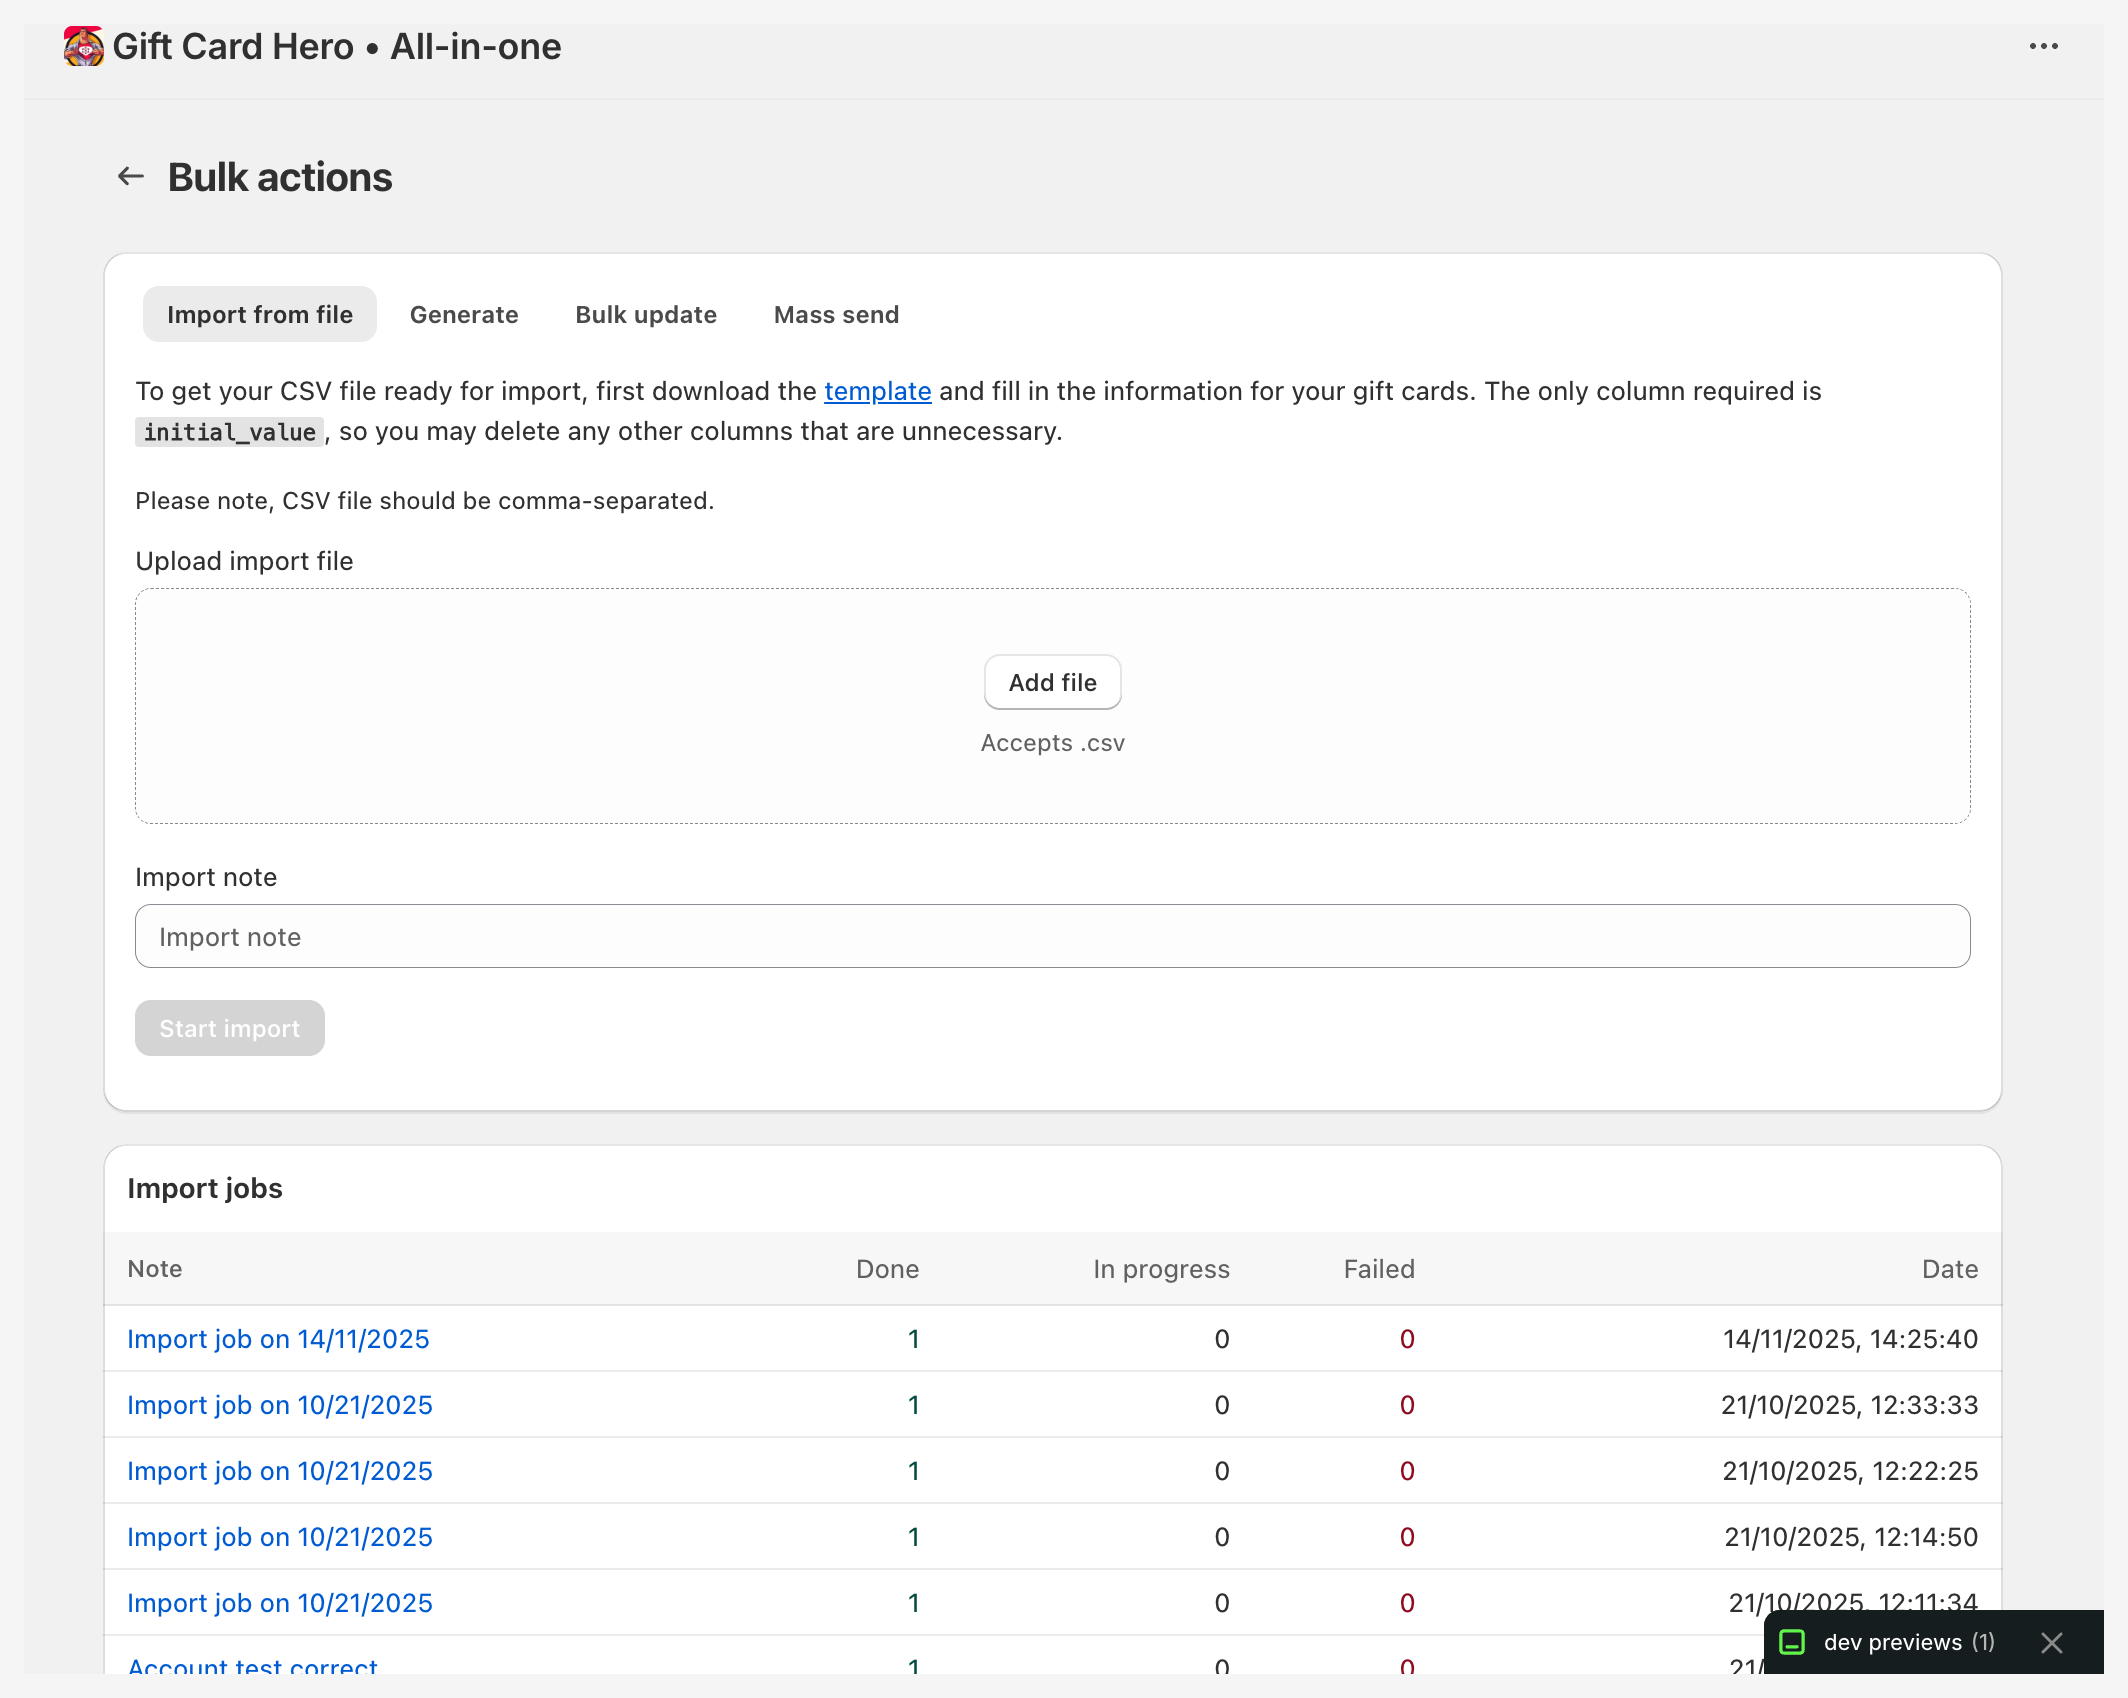
Four types of bulk jobs
The Bulk actions page has four tabs:
| Tab | What it does | Best for |
|---|---|---|
| Import from file | Creates gift cards from the rows of a CSV file, with your own codes or generated ones | Moving cards from another system, pre-loaded physical cards |
| Generate | Creates a batch of codes with the same value, no recipient | Physical card programs, codes you hand out yourself |
| Bulk update | Changes existing cards listed in a CSV file: balance, expiry date, note, customer, artwork, or disables them | Adding bonus credit, correcting balances |
| Mass send | Creates a card for each email address and emails it to that person | Corporate gifting, loyalty rewards, promotions |
Bulk Generate
Use this to create a batch of gift card codes that you'll distribute yourself (e.g., print them, add them to packaging, hand them to a partner).
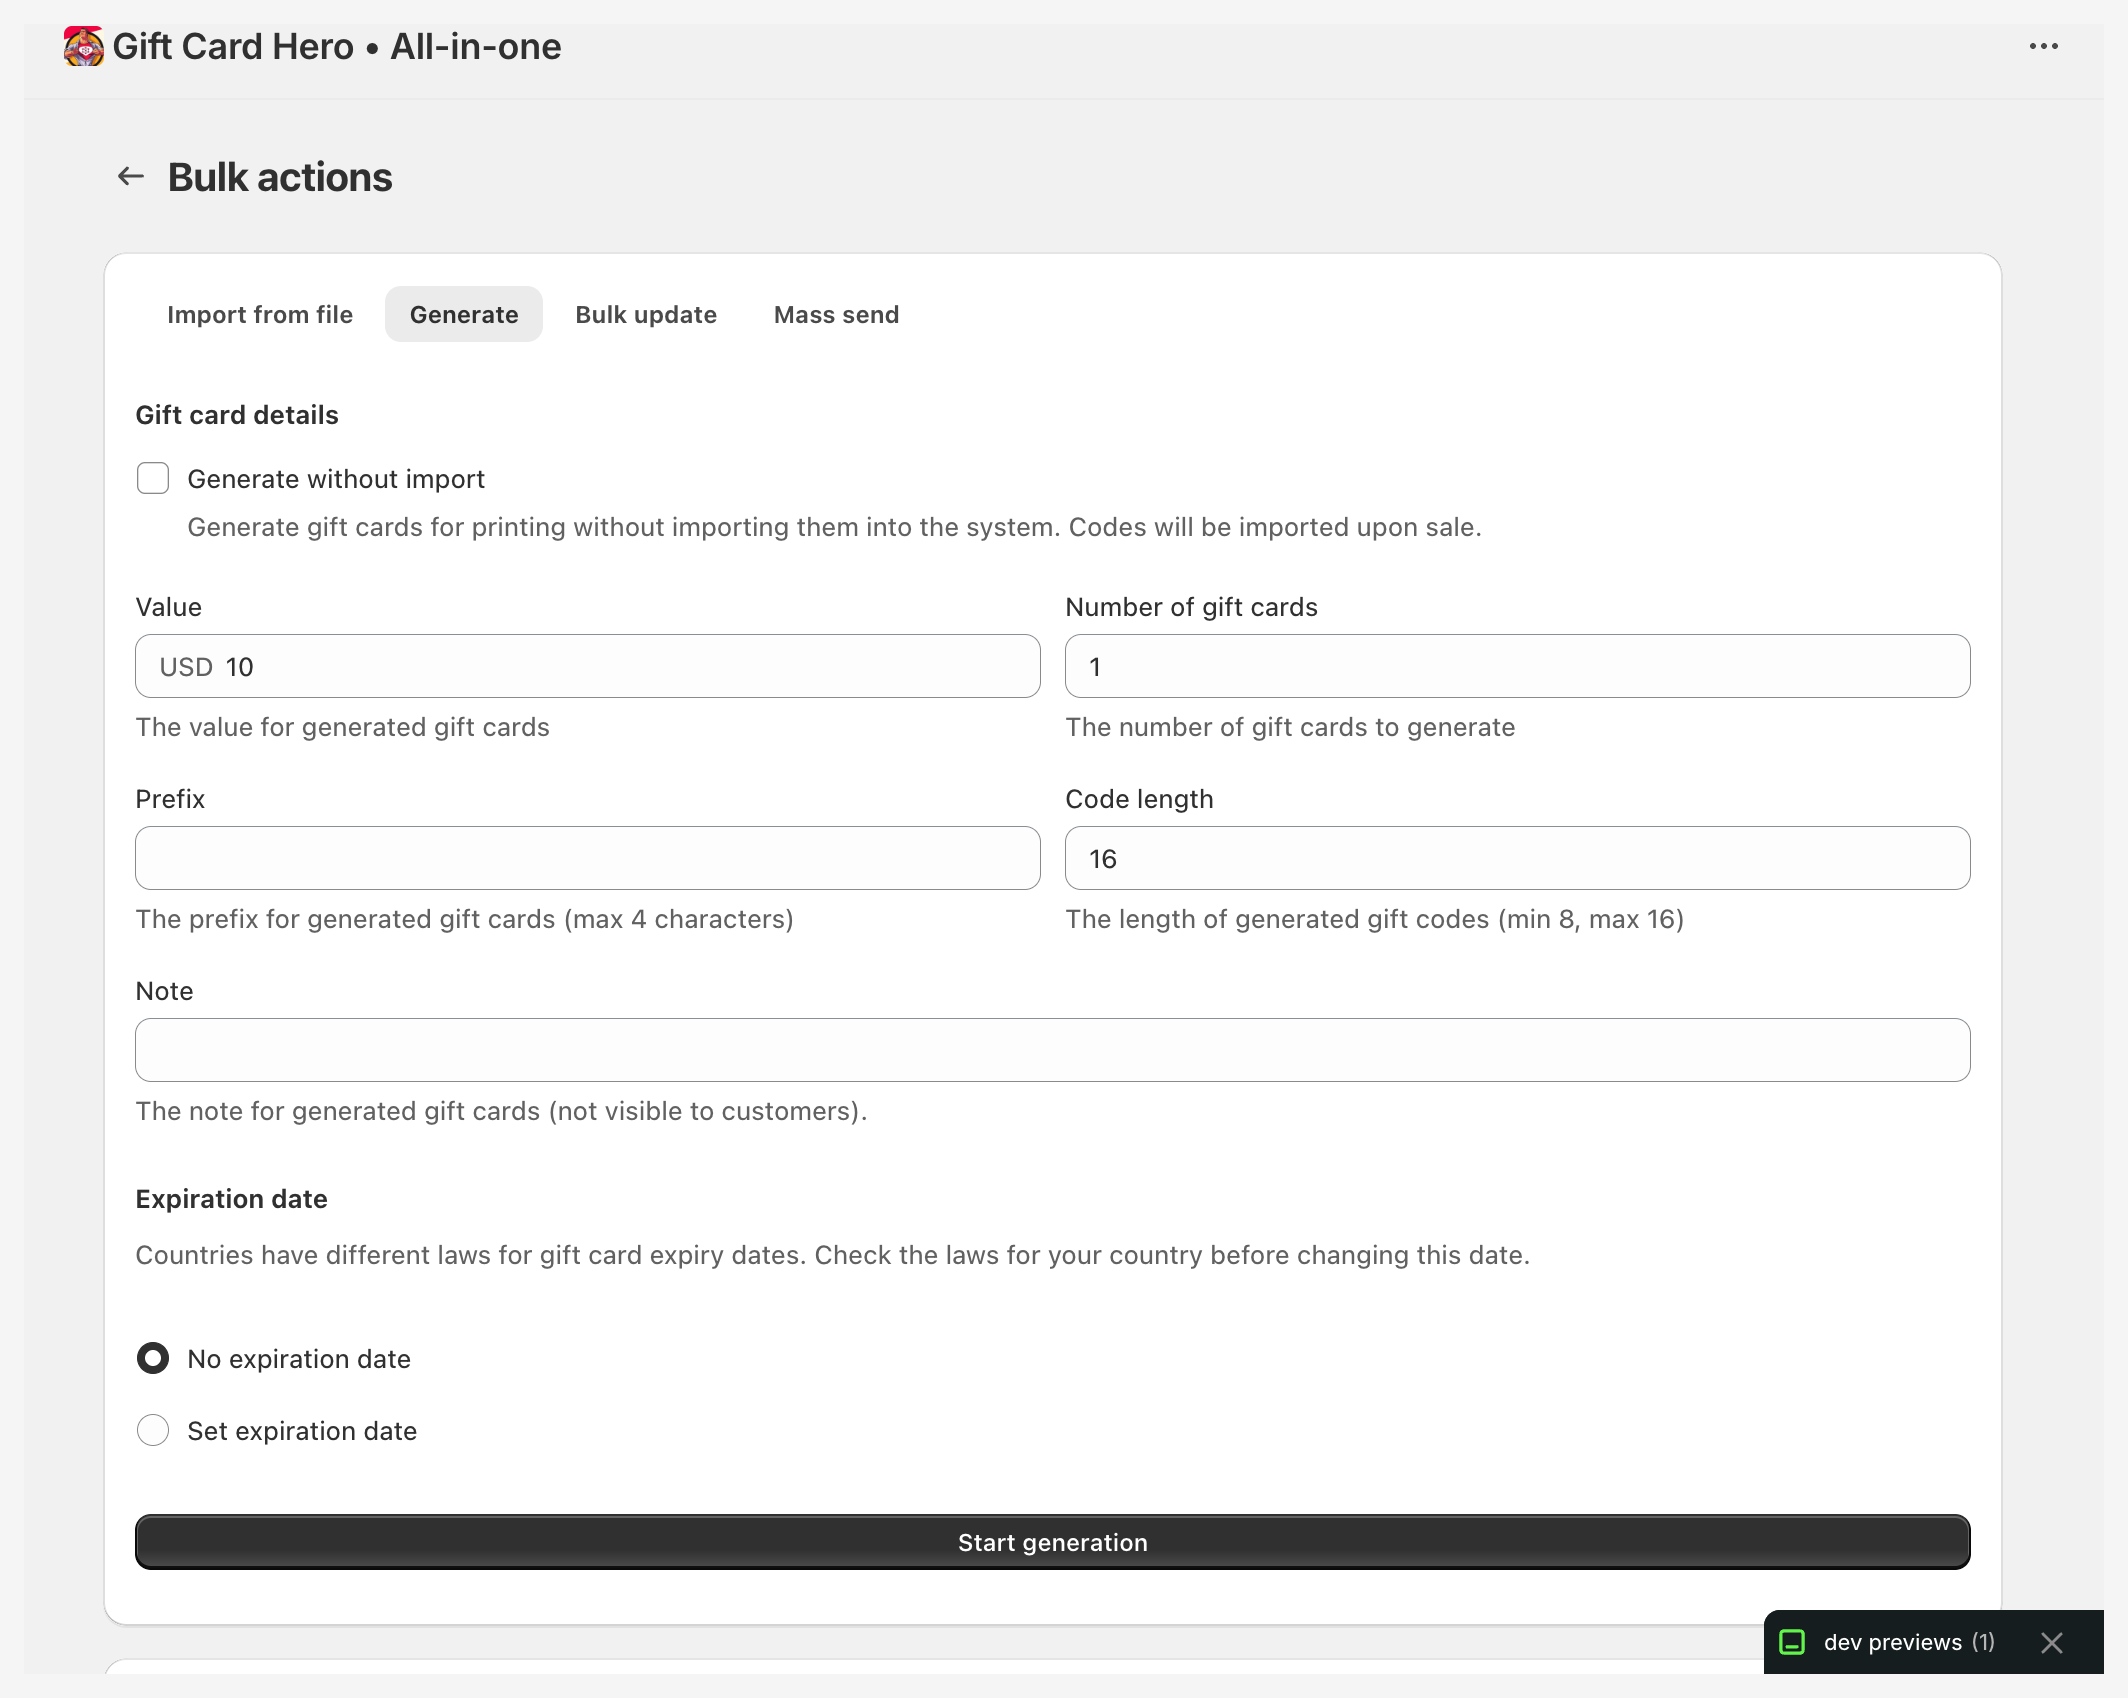
Settings
| Field | Description |
|---|---|
| Generate without import | Codes for printing only, see below |
| Value | Balance loaded on each card |
| Currency | Currency the cards are issued in. Only shown when your Shopify Markets enable more than one, see Cards in other currencies |
| Number of gift cards | How many cards to create, up to 100,000 per job |
| Prefix | Optional, up to 4 characters added to the start of every code |
| Code length | 8 to 16 characters. Batches over 10,000 cards use at least 14 characters, so codes don't collide |
| Note | Internal note saved on each card, not visible to customers. It is also the job's name in the Generate jobs list |
| Gift cards images | Artwork the generated cards are shown with |
| Expiration date | No expiration date, or Set expiration date and pick a date |
Click Start generation to start the job.
Generate without import
Check Generate without import when the codes are for printed cards. The codes are generated for printing only: no Shopify gift cards are created, so nothing can be spent yet. Value, Note and the expiration date are disabled in this mode, and the job is finished as soon as it is created.
When the printed cards arrive, bring the codes into GiftCard Hero with Upload codes on the Physical gift cards tab, or register each card as it is sold. See Physical Gift Cards.
After generation
Open the job from the Generate jobs list and click Download results (csv) to get every code. You can also select a job in the list and click Download CSV, or Download PDF for a print-ready file with one card per page (the code plus its QR code).
Unless you used Generate without import, the codes are live in Shopify as active gift cards.
Bulk Send
Use the Mass send tab to send gift cards to a list of people. Each email address gets its own card, and the card is emailed to that address.
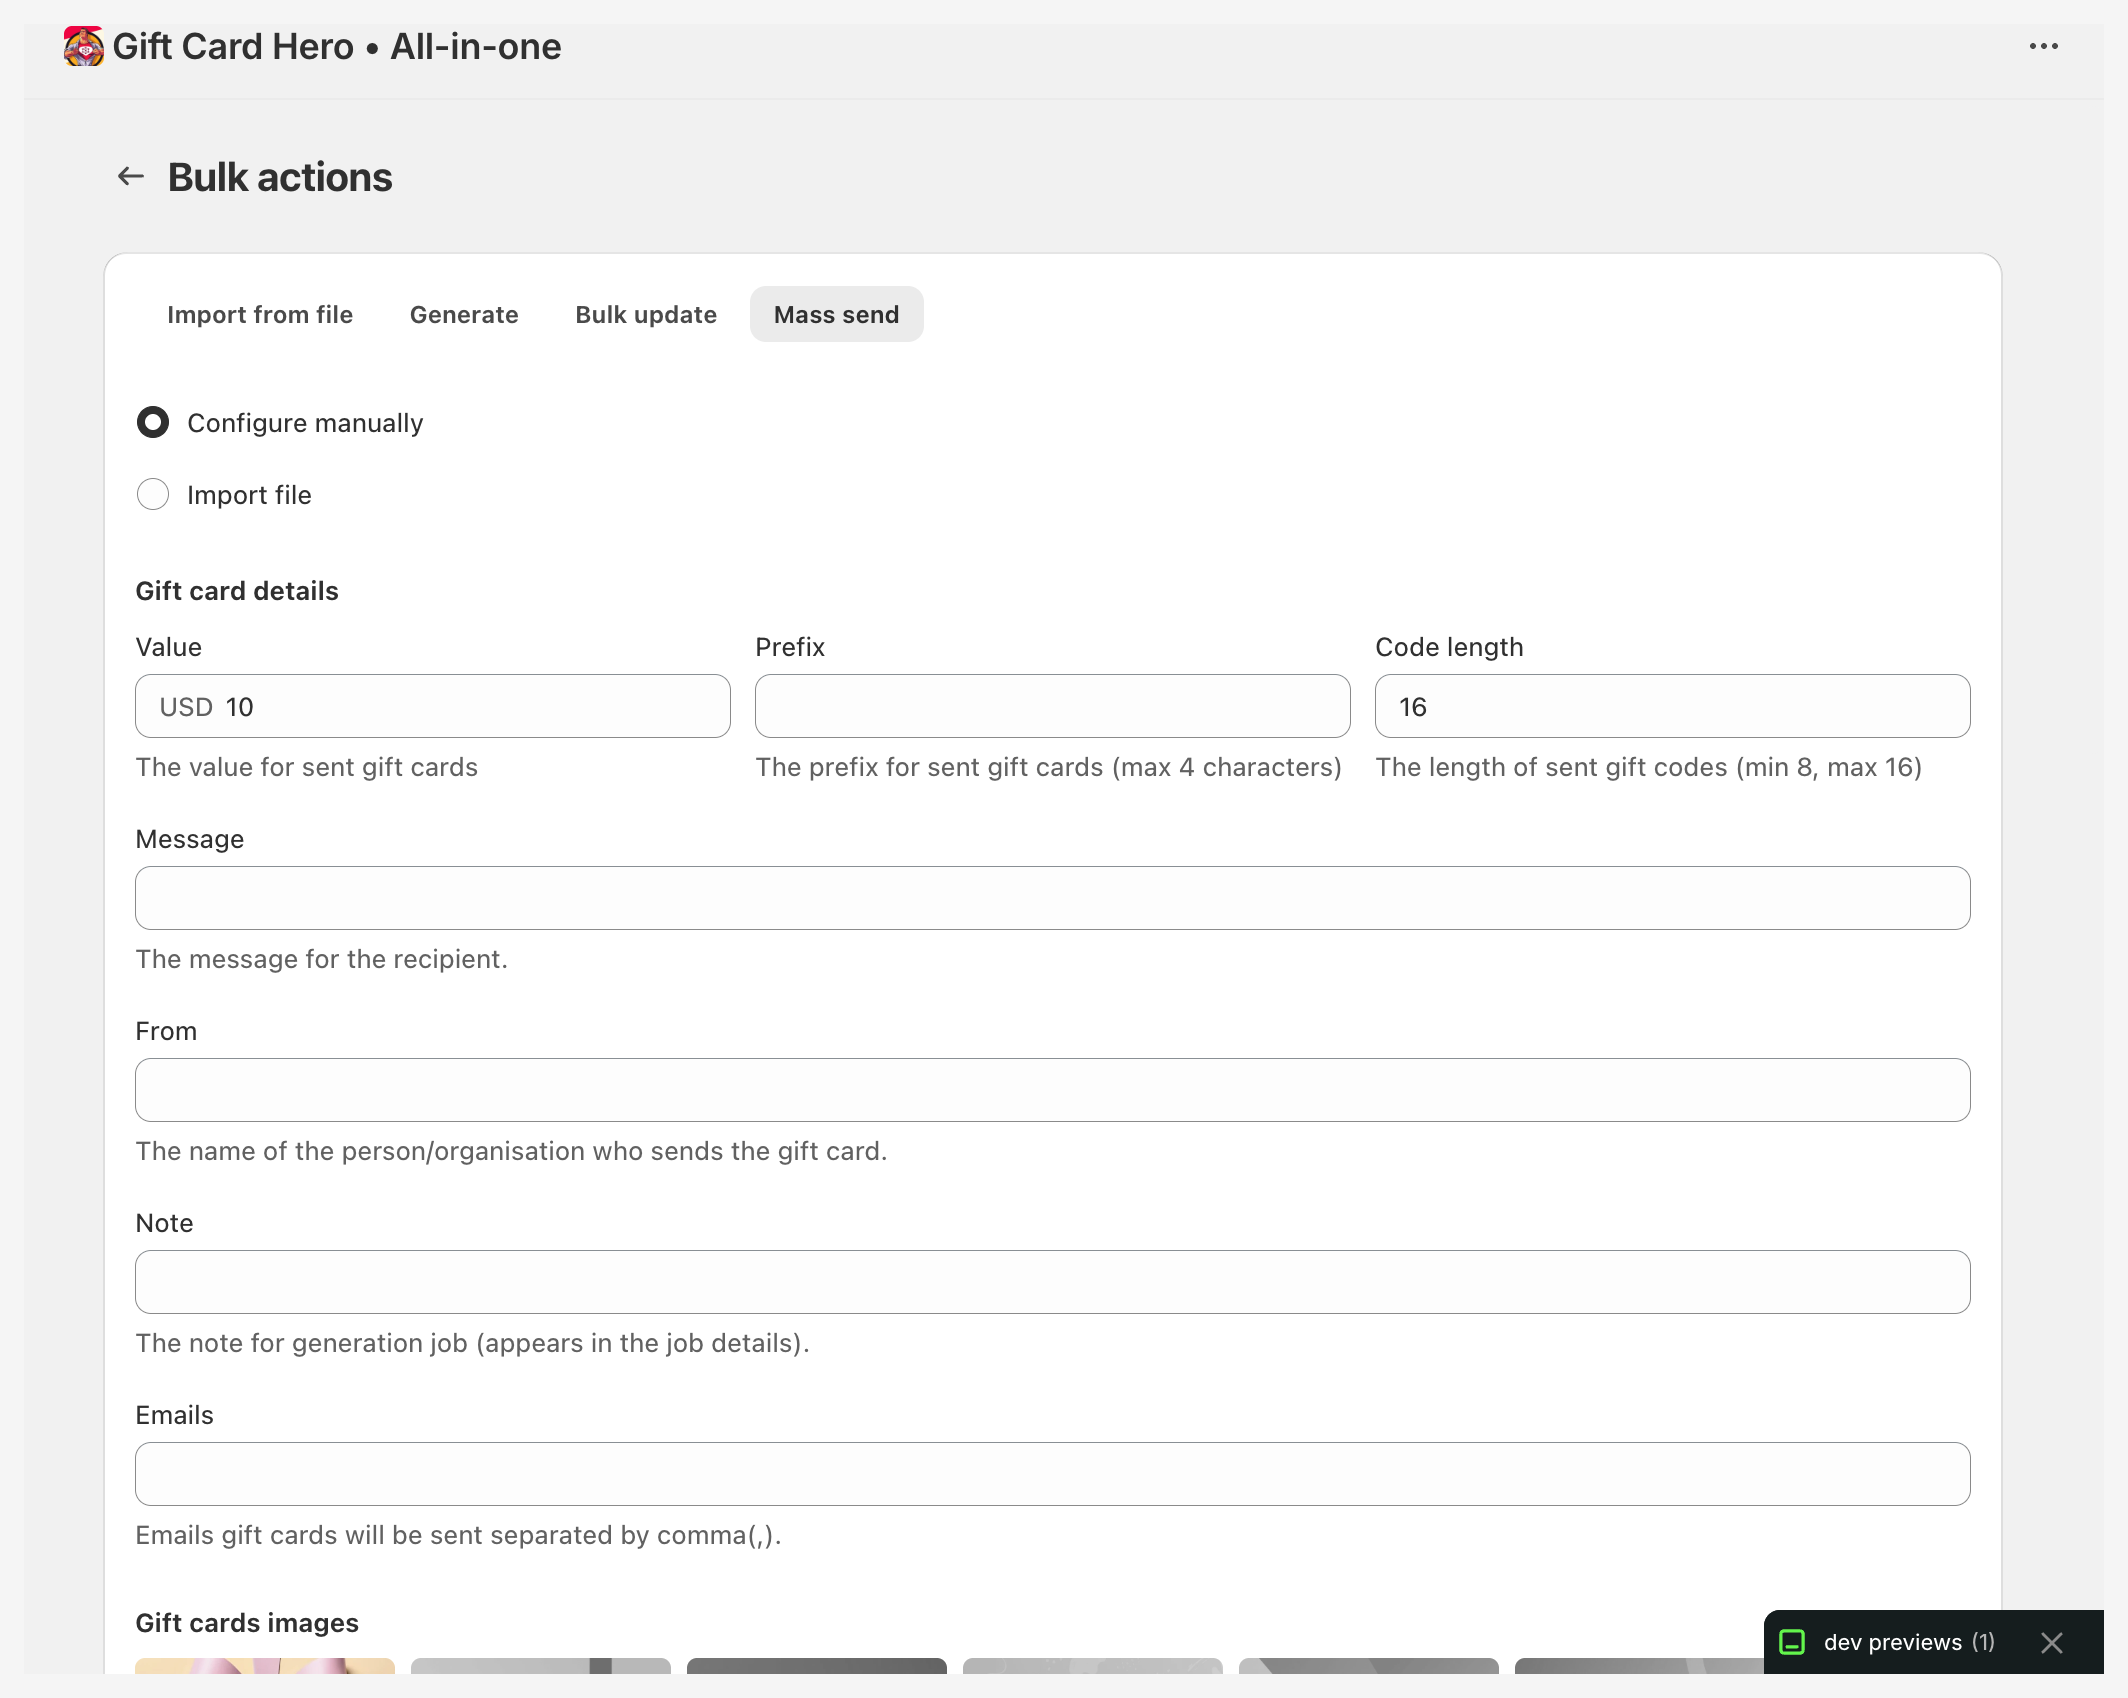
Choose how to give the list:
- Configure manually: type the email addresses and set one value for all cards.
- Import file: upload a CSV with one row per card.
Configure manually
| Field | Description |
|---|---|
| Value | Balance of each card, with a currency picker when your markets enable more than one currency |
| Prefix | Optional, up to 4 characters added to the start of every code |
| Code length | 8 to 16 characters |
| Message | Message for the recipient, up to 255 characters |
| From | Name of the person or organisation sending the card, up to 40 characters |
| Note | Internal note, also shown as the job's name in the Mass send jobs list |
| Emails | Recipient email addresses, separated by commas |
| Gift cards images | Artwork the cards are shown with |
| Expiration date | No expiration date, or Set expiration date and pick a date |
Preparing your recipient list
For Import file, download the template and fill in one row per card:
| Column | Required | Description |
|---|---|---|
initial_value |
Yes | Amount the card is issued with |
currency_code |
Optional | Three-letter currency code, e.g. EUR. Leave empty for your store currency. See Cards in other currencies |
email |
Yes | Email address the card is sent to |
message |
Optional | Per-recipient personal message |
from |
Optional | Sender name shown with the card |
note |
Optional | Internal note saved on the card |
expires_on |
Optional | Expiry date in YYYY-MM-DD format |
image |
Optional | https:// link to the artwork for this card, see Custom artwork per card |
Example CSV:
initial_value,currency_code,email,message,from,expires_on
50,,jane@example.com,Thank you for your loyalty!,Acme Store,2027-03-15
100,EUR,bob@example.com,Happy birthday Bob!,Acme Store,
The design you pick under Gift cards images is used for every row without its own image. Click Start mass send to start the job.
Bulk Update
Change a set of existing cards on the Bulk update tab. Use cases:
- Add $10 bonus credit to a list of cards
- Correct an incorrect balance after a system issue
- Move expiry dates, disable cards, or give them new artwork
Upload a CSV with the following columns. Each row needs id or code:
| Column | Required | Description |
|---|---|---|
id |
id or code |
Shopify gift card ID |
code |
id or code |
The full gift card code. Spaces and dashes are ignored |
balance |
Optional | New balance. Use a + or - prefix to add or subtract instead (e.g., +10.00 adds 10, -5.00 subtracts 5) |
expires_on |
Optional | New expiry date in YYYY-MM-DD format |
note |
Optional | Internal note. The row's value replaces the card's note, and an empty or missing note clears it |
disabled |
Optional | Put 1 to disable the card. This cannot be undone. Leave it empty to keep the card active |
recipient_email |
Optional | Sets the card's recipient (found or created as a Shopify customer) |
customer_email |
Optional | Sets the card's customer (found or created as a Shopify customer) |
notify_customer |
Optional | 1, true or yes emails the card to the customer in customer_email |
notify_recipient |
Optional | 1, true or yes emails the card to the recipient in recipient_email |
image |
Optional | https:// link to new artwork. Re-skins a card that already exists |
currency_code |
Optional | A check, not a change: the row fails if the card is not in that currency. A card's currency can never be changed |
code,balance
ABCD-1234-EFGH-5678,75.00
IJKL-9012-MNOP-3456,+10.00
QRST-7890-UVWX-1234,-5.00
Note: A plain number sets the balance to that value. A
+or-prefix adjusts the current balance instead. To add $10 to a card with $40, either setbalanceto50.00or use+10.00. If you edit the file in a spreadsheet app, check that the+is still there when you save, otherwise+10.00becomes10.00and sets the balance to 10.
Bulk Import
Import existing gift cards from other systems on the Import from file tab.
Upload a CSV with the following columns:
| Column | Required | Description |
|---|---|---|
initial_value |
Yes | Amount the card is issued with |
currency_code |
Optional | Three-letter currency code, e.g. EUR. Leave empty for your store currency. See Cards in other currencies |
code |
Optional | Gift card code, 8 to 20 letters and numbers. Spaces and dashes are ignored. A 16-character code is generated if the column is empty |
expires_on |
Optional | Expiry date in YYYY-MM-DD format |
note |
Optional | Internal note saved on the card |
email |
Optional | Customer the card belongs to (found or created as a Shopify customer). No email is sent unless notify_customer is set |
customer_email |
Optional | Same as email; used instead of it when both are filled |
recipient_email |
Optional | Recipient's email address (found or created as a Shopify customer) |
notify_customer |
Optional | 1, true or yes emails the card to the customer |
notify_recipient |
Optional | 1, true or yes emails the card to the recipient |
image |
Optional | https:// link to the artwork for this card, see Custom artwork per card |
Steps
- Open the Import from file tab
- Download the template and fill in your cards
- Upload the CSV file and, optionally, add an Import note
- Click Start import
Cards in other currencies
If your store sells in several currencies through Shopify Markets, a bulk job can issue cards in any of those currencies rather than only your store currency.
- Generate and Mass send (Configure manually): pick the currency next to the value field. The picker only appears when your markets enable more than one currency.
- Import from file and Mass send (Import file): fill in the
currency_codecolumn, e.g.EUR. An empty column means your store currency. - Bulk update: a card's currency cannot be changed. Filling in
currency_codeonly checks that the card is in that currency; a row that names a different one fails instead of adjusting the balance in the wrong money.
A row naming a currency your markets have not enabled fails on upload with an explanation and the list of currencies you can use. No card is created for that row; the other rows are processed as usual.
What the card holds
The card is issued in the currency you chose and keeps its balance in it. Whether a shopper can then spend it in a different currency is controlled by Cross-currency redemption, under Enable Shopify Markets support on the eGift/Physical cards → E-Gift cards page:
| Setting | Behaviour |
|---|---|
| Shopify default | Shopify decides, based on your store and market settings |
| Only in the card's own currency | The card is refused at checkout in any other currency |
| Convert at your market's exchange rate | Uses the rate configured for the market |
| Convert at the spot exchange rate | Uses the standard spot rate at checkout |
Analytics
Dashboard totals are in your store currency. Cards in other currencies are listed separately above the tiles, with their own count and totals per currency. Amounts in different currencies cannot be added together into a single figure.
Custom artwork per card
Import, Bulk update and Mass send files can give each card its own picture through the image column.
- In your Shopify admin, open Content → Files and upload your artwork.
- Hover the file and click the link icon to copy its URL.
- Paste the URL into the
imagecolumn of the row.
The copied link looks like this:
https://cdn.shopify.com/s/files/1/0594/1241/4670/files/gift-card-birthday.png?v=1671206648
- The value must be a full URL starting with
https://.http://, protocol-relative (//cdn.shopify.com/...) and bare file names are rejected, and the row fails with an error on the job's Results page. - Keep the
?v=...suffix; it is part of the link Shopify gives you. - A per-row
imageoverrides the design selected on the page, so one file can mix several designs. - Use roughly 1000 × 600 px (5:3) PNG/JPG/WebP images under 2 MB.
- Generate jobs have no CSV. Pick the design under Gift cards images on the Generate tab instead.
For the step-by-step version, see Managing Gift Cards with Bulk Actions.
Tracking results
Every tab lists its jobs under the form (Import jobs, Generate jobs, Update jobs, Mass send jobs), with the number of rows that are Done, In progress and Failed. Click a job's note to open its Results page.
The results page shows every row with its status:
- Success: the row was processed
- In progress: waiting or being processed
- Retrying: the row hit an error and will be tried again automatically
- Failed: the row failed after its retries ran out, or was invalid on upload (e.g., wrong code format, bad image URL). The error is shown with the row
Check Autorefresh import jobs to keep the page updating while the job runs.
Results CSV
Click Download results (csv) on the results page. The CSV has one line per row of the job, with its fields (code, value, currency, email, note and so on) plus:
status: done / in progress / failederrors: error message if the row failedqr_identifier: the text a Shopify gift card QR code encodes for this code (shopify-giftcard-v1-followed by the code in capitals), for printing QR codes on physical cards
Limits and performance
| Limit | Value |
|---|---|
| Max cards per Generate job | 100,000 |
| Max CSV file size | 5 MB |
Jobs run in the background, so you don't need to keep the browser open. You can't start a job identical to one that is still running (same file, or same Generate or Mass send settings); wait for the first one to finish.